Pages

Tuesday, June 22, 2021

Olive's Princess Book

What a fun fun project to do for this sweet grandbaby of mine!! Olive had a 'Princess Day' and had a ball. I had made her an autograph book (I think I have a pic of it) and she made sure she got all the princesses autographs and a couple of the prince's also. I made this book to hold her autograph book as well as the photos her momma took of her with the princesses. There is a ton of space to journal about that day and about how she liked each princess. I hope this will be a keepsake for her and someday when she's older it will bring a smile to her sweet face. 


Here's her autograph book I made her...the front and back. I used my Cricut to do the graphics on the book. 


Olive's favorite color is purple so, I had to make sure I used that color throughout the book of course.


Inside the front cover I added an autograph book box with a magnetic closure to hold that precious autograph book with all those princesses autographs she got. There is a small little pocket above the box with a pull out tag that I wrote a little something on for her and the date. The rest of the pages are all pictures with pockets holding 3 different sized tags for extra pics or journaling about that particular princess and Olive. Each page also has a large pull out tag inside with a scalloped pull.

The inside cover has the autograph book holder. It has a magnetic closure to keep it in place securely.

Page 1. All of the pages have tags to use for journaling or extra photos as the picture pocket has ample space to hold several. 

All of the pages have the extra large pull out tag/photo mat to house those larger 5x7 pics or even 8x10 without much cropping. (excuse the flash of light across the pics)

Page 2. Not even sure who this princess is.... LOL

Page 3. Oh yikes the glare!!!! Sorry everyone!!! 

Page 4. I've seriously got to watch that darn glare!

Page 5.

Page 6. I don't think Tinkerbell is a princess....but hey, who am I to question it. ;-)

Page 7. Ok, ok, does anyone know who this one is?? I don't think Olive knows either from the look on her face.... ??

Page 8. Gotta' have a prince ...right?

Page 9. Notice this nice prince......look how happy the princess is with him.....

Page 10.

Page 11. Ok, did you catch it?? Doesn't that prince look familiar? Heck yes he does, he is a two timer....see page 9. Yep, Olive's got a secret for sure!!! ;-)

Page 12. Olive think Rapunzel knows about the cheatin' prince, she looks a little worried.

Page 13. Such a happy princess....she hasn't met the infamous prince obviously.


Page 14. Olive is about to burst with what she knows....don't tell Olive...don't tell.

Inside the back cover & 'The End'. Who knew there could be such drama at a 'Princess Ball'. Just goes to show you folks, you just never know. ;-) 
I didn't do a youtube on this one, I didn't have time, I wanted to get this album to my granddaughter asap as I knew she was anxious to get it....but I have the pics.... never know when you might need them...know what I mean? (wink wink) 0:-) 

Check back soon, I will be posting another project shortly!!! Be sure to check my youtube channel now that all the videos are on one channel:    Brenda Crouch     


Tuesday, June 8, 2021

Flutter Waterfall Album


Normally I am not one to get excited over using flowers, but I had some of this collection left: Graphic 45 Flutter and knew I had to do something with it. Soooooo..... this album came to life. This is a large album measuring 8 1/2 x 10 1/2 and is quite bright and busy, but I think that is the way this had to be. 
On the cover I have of course a sheet of the beautiful Flutter pattern paper and used an ivory cardstock for the base of the album with everything inked in Sepia (I prefer to ink my albums as it just gives it a finished look to me). I added a beautiful jeweled butterfly as this collection has several through out as well as a jeweled dragonfly. The large metal flower was an after thought, as it came from an auction in a metal frame, so I had my hubs cut it out and I thought omg, perfect for the album cover (you never know where you will find some items to repurpose and spark your imagination). In the center of the large metal flower, I added a cardstock flower since the center was bare to finish it off. On the spine I have added some red ribbons...but may change those out..still debating on that element. 

I do believe I will be changing that ribbon, I think it needs to be 'fluffier'....I will have to stare at it for a while longer to decide what to do with it. 


This is the inside cover. I wanted to add a see through pocket so you could see what was in it (makes sense right?), so I used some acetate to make the window and added some jeweled flying pretties (dragonfly and butterfly) on the pocket. It is a good sized pocket and is an expandable pocket so it can hold quite a few tags or pictures. With the album being so floral, I used an edge punch to make the flap a bit more feminine and it has a magnetic closure to keep everything in place. On the inside cover is also a pretty 'sheer' butterfly. I have added butterflies to every page as they are prevalent in this collection. 


The flap opened and the large cards removed to show the inside (yes I even decorated the inside of the pocket).


The pocket open and the 2 large cards/tags/mats shown. Such a beautiful collection and I really like this acetate pocket.


Page One. There are only 3 pages to this large album, but each page has a waterfall on it. I always try to incorporate a waterfall into my albums because they take up such a small space but provide a vast amount of space for pictures. I made each waterfall to accommodate 4 x 6 pictures, so there are 4x6 waterfalls in the landscape mode as well as 4x6 waterfalls in the portrait mode. There are a total of 3 of each...6 waterfalls in all. That's a lot of pictures!!!!! Each page also has a large pull out pocket complete with a magnetic closure to hold larger photos, letters, or anything you want to store in them. The flap as you can see folds over the page and appears as an 'envelope'.


The large pocket pulled partially out and opened to show it's size and flap.


Wowza! Now that's a large pocket folder! It will hold lots of larger photos, letters or any other memorabilia you would like to save in the album.


Pages 2 & 3. 


On this page (2) as you can see there is another waterfall and this one is in the 'portrait' mode. Also on this page as with all of them, there is a pretty butterfly gracing the page among all the ones in the pattern paper. This collection is so colorful and busy, but sure does work well together!


Page 3. As before another waterfall and this one is of course in the landscape mode. Another large pocket folder to hold those large items. I alternated between the landscape mode and portrait mode for the waterfalls. The next pics will be of the pages that follow and are in the same format.


Pages 4 & 5


Page 4. This paper is NOT from the Flutter collection, but I ran out of the florals and found this one in my stash. I thought it worked out well.


Page 5. Don't you love the bright bright colors and patterns!

Pages 6 & Inside back cover


Page 6. I tried to use a different color ribbon on the waterfalls based on the coloring in the top pattern paper piece. I also tried to use a colored butterfly depending on the background paper.

Inside the back cover. I wanted to add another place to house extra pictures, journaling, letters and other memorabilia. This envelope is large: 5 3/4 x 8, so plenty of space. The flap is tucked behind the jeweled butterfly spot closure for easy access but a firm hold to keep everything inside safe. The black sheer butterfly just looked like it belonged on this part of the album.
 
I hope you enjoyed this creation and I have inspired you in some way. Feel free to comment below and be sure to subscribe to my youtube channel. https://www.youtube.com/watch?v=1kf-0bIPB8U

Cutting Guide:
Chipboard:  (2) 10 1/2 x 8 1/2 (cover)
                    (1) 2 x 8 1/2  (spine)
Cardstock:  (2) 12 x 12 (cover)
                   (1) 10 1/2 x 4 (spine)
                   (1) 7 7/8 x 4 1/2 (hinge) Score with 4 1/2 across the top 
                   @ 1/4 * 3/4 * 1 1/4 * 1 3/4 * 2 1/4 * 2 3/4 * 3 1/4 * 
                   3 3/4 * 4 * 4 1/4    Accordion fold 
                   (3) 8 x 10 (page top piece)
                   (3) 9 x 10 (page bottom piece) Score with 9" across the 
                   top 1/2" turn 1/2" on opposite side
                   (3) 8 3/4 x 9 1/2 (Large pockets for pages top piece)
                   Score with 9 1/2 across top @ 1/2" each side
                   Score with 8 3/4 across top @ 1/2
                  (3) 11 x 7 3/4 (Large pockets for pages bottom piece)
                   Score with 11" across top @ 3 to make pocket flap
                  (3) 6 x 8 (Waterfall base for the landscape format)
                  (24) 4 1/2 x 6 (Landscape waterfall pages) Score with 6"
                   across the top @ 1/2"
                  (3) 4 x 8 (Portrait waterfall base)
                  (15) 6 1/2 x 4 (Portrait waterfall pages) Score with 6 1/2
                   across the top @ 1/2"
                  (1) 8 x 7 (Inside cover window pocket base) Score with 7
                   across top @ 6"
                  (1) 7 x 6 (Inside cover window pocket top piece) Cut out
                  center leaving 5/8" frame all around
                  (2) 5 7/8 x 4 (Sides for the window pocket) Score both
                  with 5 7/8 across top @ 1/2 * 1 * 1 1/2 * 2 * 2 1/2 * 3 *
                  3 1/2 Accordion fold
Pattern Papers: I cut my papers 1/4" shorter all around to give a nice
                  1/8" border all around
Acetate:    (1) 5 x 6
Magnets:  (3) for the large pocket flaps

Notes:

Ink all pieces before assembling as it's much easier. I used Prima Color Philosophy Sepia.

Round corners on bottom pieces of the large page pockets for easier insertion and removal.

Attach bottom page piece to hinge first then add top page piece.

Burnish all score lines and score tape.

Attach magnets BEFORE adding pattern papers to the large page pockets.

Back inside cover envelope was made using my We R Memory Keepers Envelope Punch Board. It measures 6 x 8 finished.

Enjoy!!!!!!


Saturday, May 29, 2021

Envelope Box for the Mother Goose Dimensional Book Easel Card


This is the 5 x 7 envelope box for the Dimensional Book Easel Card I did with the Mother Goose theme. It has a 1" thickness to accommodate the bulk of the card as a regular envelope wouldn't be able to handle it and would cause serious 'smashing' of the "book" feature and any extra embellishments that are added to it. The thickness can of course be adjusted to fit whatever size is needed easily. In my opinion, I would want to hand deliver this anyway, but, if I decided to mail it, I would also put this in a sturdy box as this is made from cardstock. I really like how it turned out and had to embellish the front as well as the back. :-)   

I papered the front, back, sides and top and bottom with Graphic 45 Curtain Call then grabbed the rest of my Graphic 45 Mother Goose pad and papered the front. I fussy cut some of the main paper as I wanted only certain elements to show and used some of the script nursery rhyme Mary Had A Little Lamb so that is the part I wanted to use. I also used some ribbon to finish the front. 

I used one of the Mary Had a Little Lamb cut a parts on the back (of course all the papers have been inked using Prima Color Philosophy Chat Noir) making it into a pocket. I fussy cut another section of the main paper page to get Humpty Dumpty to use as a 'tag'. I attached some of the same narrow ribbon to it for a pull.

On the back of the tag, I stamped my stamp and dated it. I'm trying to remember to date what I make.  


I collapsed the card so it would be ready to slide into the box envelope. What a fun fun project to do. Many thanks to Sam Calcott for such inspiration!!

Cutting Guide:

Cardstock:  7 1/4 x 9 1/4  (Front Piece) Score on long side @ 1 & 8 1/4 turn, score on short side @ 1 & 6 1/4

Cardstock:  7 1/4 x 9 3/4 (Back Piece) Score on long side @ 1 & 8 1/4 & 9 1/4 turn, score on short side @ 1 & 6 1/4

BURNISH ALL SCORE LINES. 

Front piece: On short end cut at both score lines up to long 1" score line. Remove the long center piece between the 2 tabs. Miter the tabs on each side slightly.

Back piece: On short end (with single long score line) cut up both scores and remove the 2 squares (one on each side). Turn to other short end (top end) with 2 long score lines and cut up at both scores and remove the 'double squares' on each side. On the very top with the narrow scored area, slightly miter both sides (this is the flap that will fold in to close the box envelope).                     Add glue to the outside flaps on each side and along the bottom. Insert this back piece into the front piece making sure the pieces are lined up and squared off. Burnish to seal the glue. Decorate as you wish. I cut papers usually a 1/4" shorter and narrower that the base which leaves a nice 1/8" all around.

My Youtube Channel:

https://www.youtube.com/watch?v=_fzINeRKY-A&t=2s

Please stop by and check out my other videos and take a moment to subscribe. I will be posting other projects very soon AND I will be doing a GIVE A WAY very very soon!!!!! 

 Dimensional Book Easel Card


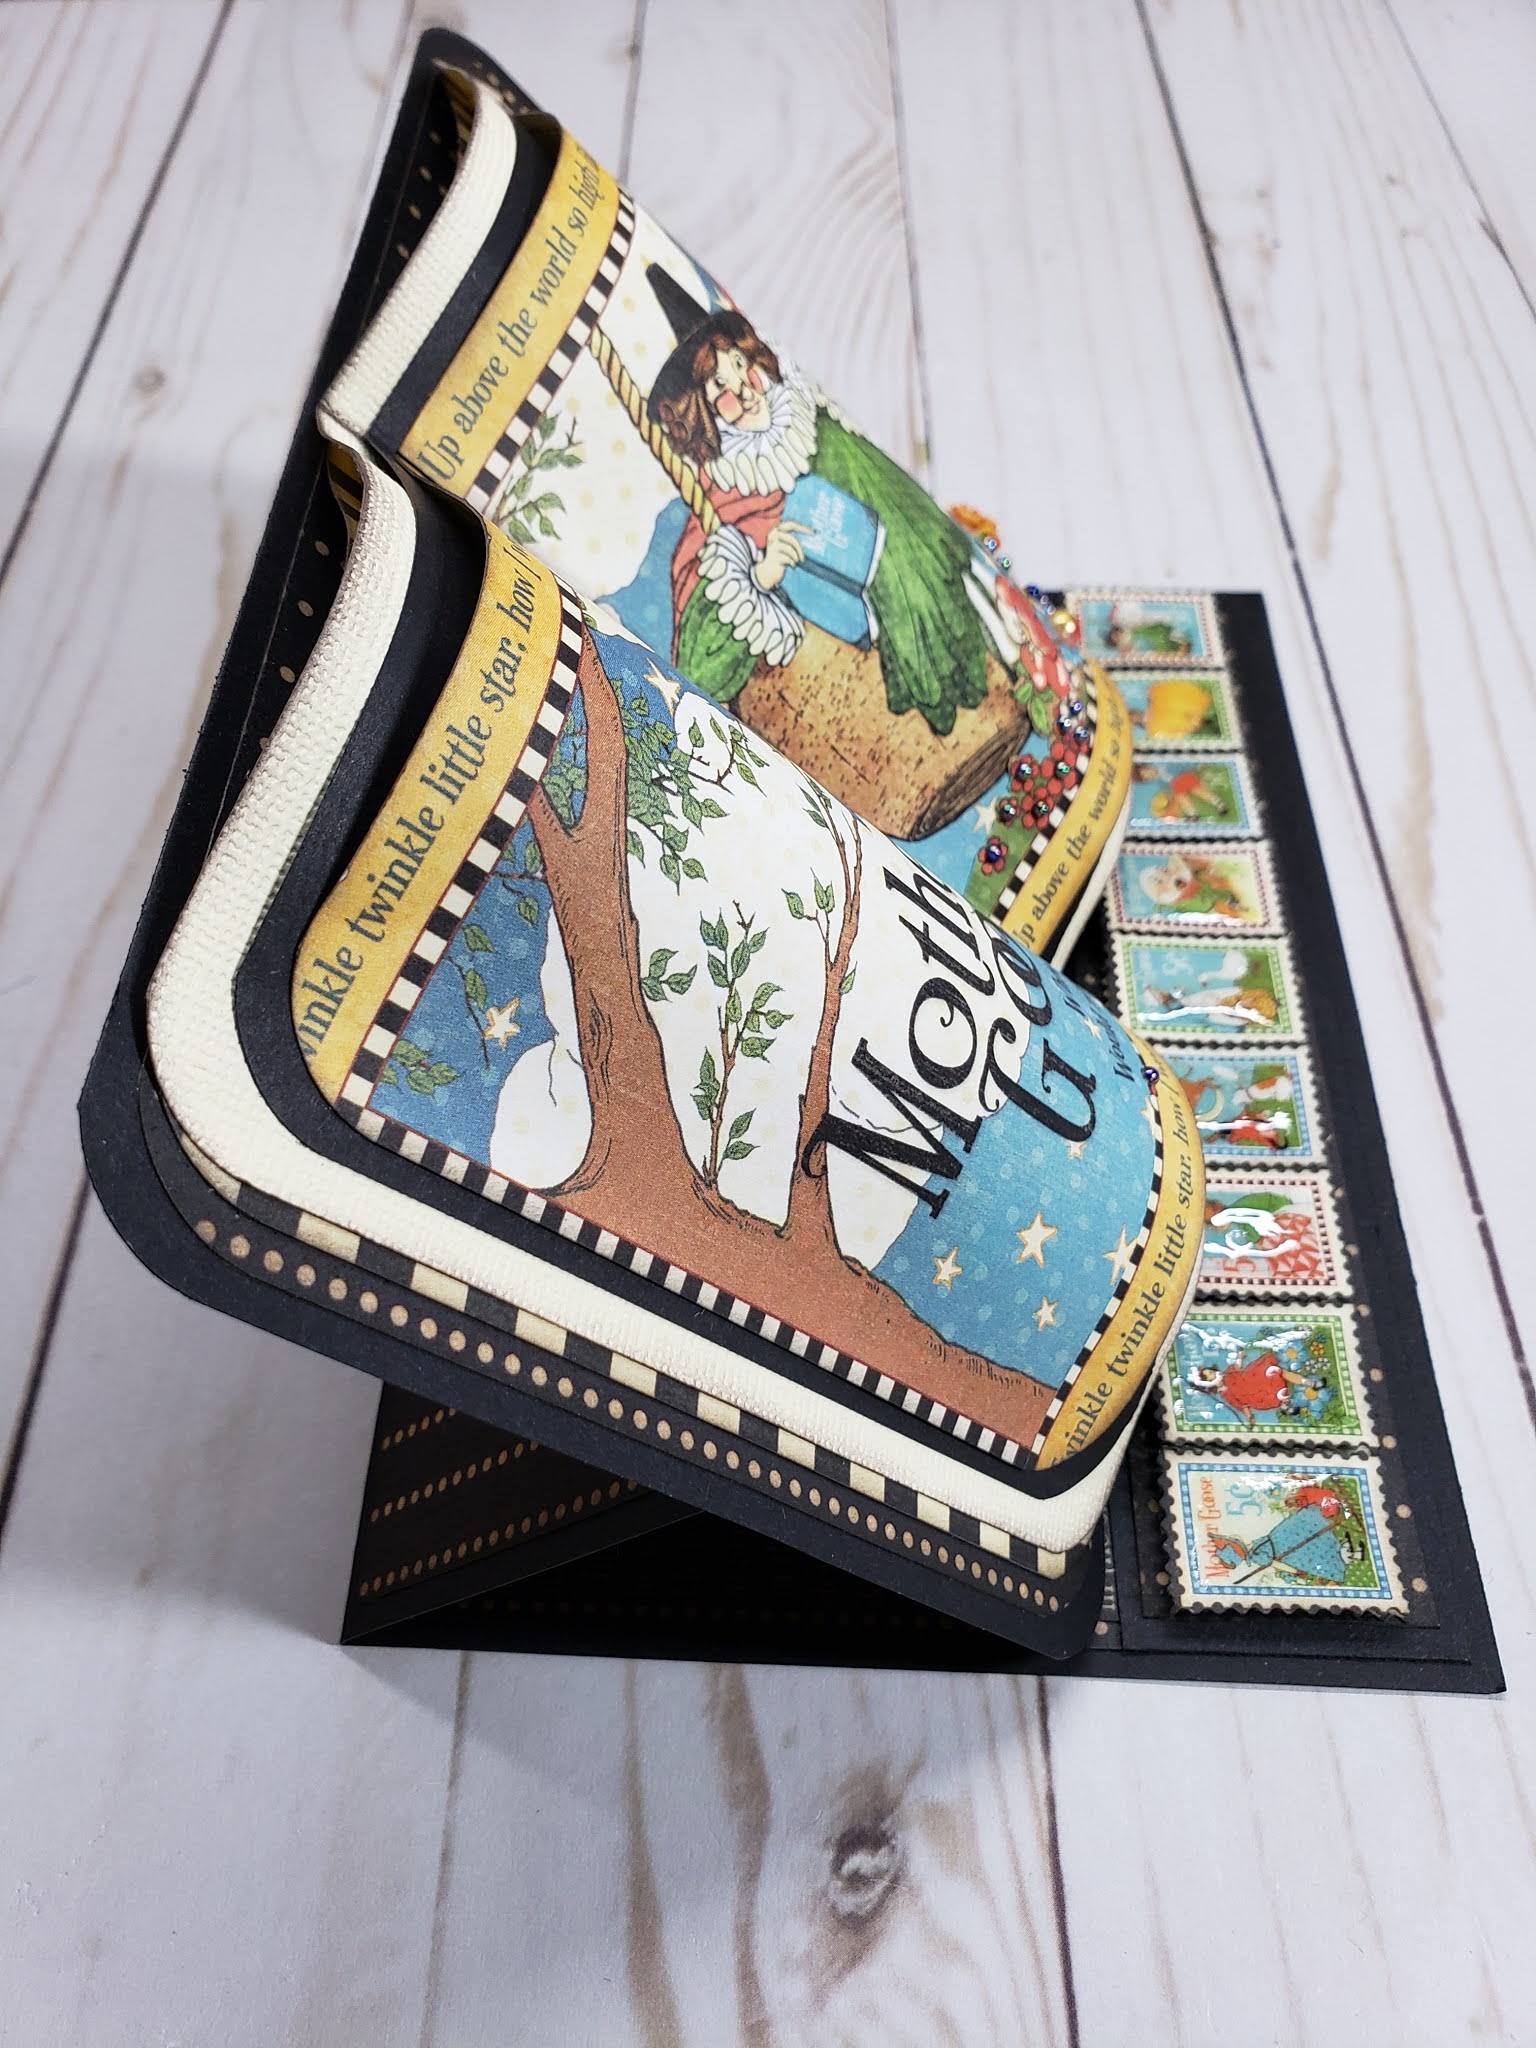
I just love how this turned out! Although it's a 'card' it certainly looks like a book with the dimension added. I also wanted some of the elements to pop, so on the bottom stop I used Diamond Glaze and covered the individually fussy cut stamps. I pop dotted these on top of the 'same' stamp strip under it. I used some of my stash of flat back pearls to add centers to the flowers and fussy cut so that Mother Goose wouldn't lose any of her wing and the flowers wouldn't lose their leaves below. I was inspired to create this book easel card by Sam Calcott, such a fun designer. I used black cardstock for my bases and used Graphic 45 Curtain Call and Graphic 45 Mother Goose to put it all together. It's so easy to combine some of the Graphic 45 collections.... I have done that several times in the past. 


Hmmmmm, the Diamond Glaze isn't showing up very well, but trust me, it sure looks pretty cool on those fussy cut stamps. The flat back colored pearls are placed and used as flower centers. I love adding dimension and seeing elements pop off the page! I'm a fool for embellishing!!


A side view of the Dimensional Book Easel Card. The stop works perfectly and it also allows the bottom stamps to also not be hidden.


A top view so you can see the depth and dimension of the book/card. 


I thought the flat back pearls made awesome flower centers!


This is just showing the book/card lying flat and not standing via the easel.


Honestly, I do love this one. Gosh, I would just about have a stroke if I received something like this in the mail! What a neat surprise it would be.....don't you agree?!

Cutting Guide

CARDSTOCK: 10 x 7 (Score on the long side: 5 & 7 1/2 Burnish)

CARDSTOCK:  6 3/4 x 1 1/2 (Easel Stop) 

CARDSTOCK:  6 7/8 X 4 7/8 (Score along the long side in half Burnish)

CARDSTOCK:  6 1/2 X 4 1/2 (Score along long side in half Burnish)

PAPERS: 6 3/4 x 4 3/4  *  6 1/2 x 4 1/2  *  6 1/2 x 1 1/4

PAPERS: 2 pieces for the very front pages: 3 1/4 x 4 1/2


YOUTUBE WALKTHROUGH LINK:

https://www.youtube.com/watch?v=_fzINeRKY-A&t=2s


NOTE:

I will be posting the cutting guide for the box envelope in my next post.