Pages

Wednesday, March 23, 2022

Junk Mail Envelope Book
This is my design team project for Pear Tree Treasures Canada, using the fabulous Reminiscence the book 3 by Elizabeth crafts. I loved using the junk mail envelopes in my other project, so thought I'd try a book using all sizes but add a hard cover like a mini album. How cool! It measures 9 1/2 X 6 1/2 X 1  and has a total of 20 pages ( since I used 10 different sized junk mail envelopes). A great way to use those annoying things we get daily. 
The front cover has a pretty patterned paper from the collection and I added some greenery I had in my stash as well as the flower (it was a brooch at one time) I also had in my stash. I used some lace I had and thought it would go perfectly throughout the book. I have inked everything even the lace to give more of a vintage feel. 
The spine is adorned with some of the inked lace and tied in a shabby bow.

The back is papered of course with a vintage paper from the collection and inked.
The book opened
The inside cover and page 1. The people I have used throughout the book are from my stash and are by Tim Holtz as are a few of the embellishments, but some are from the collection. I did a belly band and bottom stop and used my lady to embellish those elements. It holds a large lace tie tag that could be used for a photo mat or lots of journaling. The band would hold several more as well. Page one is a large junk envelope with a window.

Contents of the inside cover and page one. 


I used an envelope I cut in half to make these pockets to hold the tags.

Page 3 holds a large bookmark (because I wasn't paying attention and I glued my envelope flap down too much) and a tag stop on the front.


Pages 4 & 5.

Pages 6 & 7. Page 6 has an envelope in it's side pocket with a magnet to keep it securely closed. Would be perfect to house several photos safely. There is also the embellishment that holds tags or pics on the front of that page bottom.

Pages 8 & 9 and their contents. The mom and child are also photo stops. This envelope holds a nice size tag and the page 9 I used an oversized photo corner to hold a bookmark.


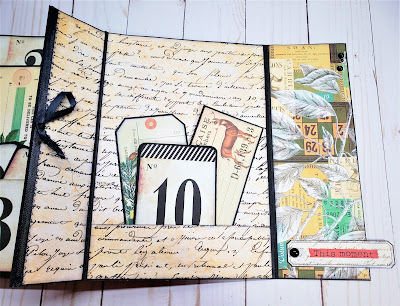
Pages 10 & 11.  A large booklet is in the pocket of page 10 and the lady on 11 holds a nice size tag or photo mat.

Pages 12 & 13. Page 12 holds a booklet while 13 the ladies are photo stops and hold a nice size tag.
Pages 14 & 15. 14 holds a large photo mat while 15 has a belly band embellished with a butterfly lady that holds a large tag.

Pages 16 & 17 these junk envelopes hold tags/photo mats and/or journaling. There is so so much space in this book using those silly junk envelopes!!

Pages 18 & 19. Envelopes covered in pretty patterned papers and holding tags.

Page 20 and inside back cover.
I used another envelope cut in half to make the pocket on page 20 and there is an embellished belly band that holds the large booklet on the inside back cover.
Tons and tons of space in this book using the junk mail envelopes.

Materials List
  • Chipboard
  • Reminiscence the book 3 collection
  • Cream cardstock
  • Sepia Ink
  • Lots of different size junk mail envelopes
  • Art Glitter Glue
  • Scoretape
  • Embellishments from my stash
  • Lace from my stash
Links

My youtube walkthrough link: 


Friday, March 11, 2022

Alice Junk Mail Pocket Booklet

OMG, what a super fun and super easy one this was! This design team project for The Rubber Buggy is my take on using those annoying junk mail envelopes that everyone gets. Woohoo, so many ways to repurpose those things. I have used the Stamperia Alice papers to make this one as it has to be one of my all time favorites collections. This 'tag booklet' measures 6 X 4 overall. Links for the collection are below. I used black cardstock and black ink to ink all of the pieces. A pretty black ribbon to finish the front even though I have a magnetic closure installed to keep it all snuggly inside. This is the front of the project.

Untying the ribbon to show the front. I used the 'window' from that envelope to hold an Alice bookmark.

The bookmark it halfway out to show how easy to use the window already made for you. I cut strips of the polka dot paper to use for the pulls on all the tags and bookmarks.

Here's the bookmark out. Gotta' love Alice!!

Opening the first pocket page you can see the embellished pocket and the 2 tags it holds. You can also see the next page across from it that is also holding tags. Several places to journal or add photos.

The contents of the first pocket page. 

Contents of the second page pocket. Love these cut a part tags. 


The center piece is actually 2 pockets and holds multiple tags.


Aren't these graphics fun fun fun!! 

The contents of the first pocket is a tag with a belly band holding another bookmark.


The bookmark out of the belly band.


Contents of the second pocket in the back. 2 large tags


Contents of both pockets.

The back of the Junk Envelope Pocket Booklet

I hope you enjoyed this project. I have a walkthrough on youtube with the link below. You can also find this collection at The Rubber Buggy and the link is also below. 


Links

https://www.youtube.com/watch?v=iRfxM7z4Afk

http://therubberbuggy.com

Materials list

  • Junk Mail Envelopes 4 X 8 5/8, 8 X 3 5/8, 8 X 3 5/8
  • Black Cardstock
  • Stamperia Alice Collection
  • Black Ink
  • Art Glitter Glue
  • Black Ribbon
  • Large Magnets
Cutting Guide

 Base envelope cut down to 6"

2nd envelope cut down to 4 3/4"

3rd envelope with window cut down to 4"

Papers I cut to cover the entire surface of the envelopes. 

Tags cut as many as you like to fit in the pockets.

Assembly

On the base envelope (largest piece) glue the flap opening shut. The second envelope line up the bottom on top of the base piece and glue the envelope closure flap to the 'back' of the base piece on the left side of the base. This 'page pocket' will open to the left. Next, place the 3rd envelope on top of the second one and line up the bottom with the base and glue the closure flap to the back of the base piece. This flap will open to the right. If you would like to use a magnetic closure, add your magnets now. Attach the magnet to the top short inside piece, I add a piece of scoretape on top to give it extra secure stick. Place the other magnet on top with the backing piece showing and open the second page on the left to allow access to the base piece. Close the top flap and secure the magnet to the base piece, open the top flap and add a piece of score tape to that magnet on the base piece. Now you can close the left flap then the top right flap and the magnets will keep it nice and secure even after you decorate the pages and add tags. Now it's time to decorate as you wish. I cut the papers to cover the entire envelope surfaces and ink everything so no white is showing. It is also time to add your ribbon if you choose to use it. I added score tape across the back of the base envelope and placed the ribbon on top of it. Then you can place your decorative paper on top. *On your front 'window' piece, I glued the right side of the envelope closed allowing enough room for just the window pocket to hold the bookmark. That ways the bookmark doesn't get 'lost' in the entire pocket if it was all open. This does not hinder the inside pocket of that envelope when it's opened. 

Have fun doing this one and be sure to share your creations!!


Monday, March 7, 2022

Expanded Folio in a Box

This is my Design Team project for Pear Tree Treasures using the very cool collection: Reminiscence the book 3 by Elizabeth Craft Designs. 

This is the box I made to hold the 'expanded folio'. I love this collection as it has to be one of the most versatile collections ever. This paper pad has not only 'papers' but patterned 'cardstock' as well. How cool is that!
The box measures 9 X 6 1/2 X 1 1/2. I added some pretty black seam binding (a double row across the top left) and gathered it in the center adding the bow. A full black flower I made and had in my stash worked perfectly for what I was going for. I did add some golden glitter to the center of the flower.
The sides are all finished with this patterned paper. The lid was purposely made a bit larger as I wanted a slight over hang on the sides and front.
The bottom of the box with the pretty patterned paper. There was so many papers to choose from, the hardest part of this project was deciding which papers and cardstock I wanted to use.
Lifting the lid and revealing the inside of the box. The opened lid was decorated using the same patterned piece as the outside with some pretty black seam binding across the top left. One of the cut a parts (# 4 ) was also used. All of the tags and cut a parts used are in this collection.
The 'Expanded Folio' inside the box. I normally put some ribbon in the box and cross it over the albums or folios to allow for ease of removal. It just makes it so much easier.
The cover of the Expanded Folio. I really loved the patterned paper here and wanted to make sure to use it on the folio cover. I inked everything throughout with black ink and used black cardstock to base it all. The chipboard used for the box is also black. I didn't want to cover up the graphics on this cover, so I only added the 'This moment' cut a part and accented it with a black flat back pearl. I also wanted to make the flower pop, so I used the various sizes of black flat back pearls to make the flower centers stand out. 
Opening the flap closure (which is held closed nicely with magnets) you will find I have created a pocket and added a tall tag from the collection. Did I mention I love the graphics from this collection. ;-)
The tag was matted with black cardstock. 
So many pages in this folio and all have pockets with extras for journaling and/or photos.
Pocket contents.
Belly band with a matching bottom pocket. 
Contents of this page. The #1 and #12 are booklets.
The booklets have stops inside to hold photos or journaling.
This page has 3 pockets and they are magnetized so they can be removed and easily put back safely in place. These are all in the collection.
I love how this page turned out. Look how much it has to offer, plenty of space for several photos and or journaling. I love all the number cut a parts.
This page has an expanded pocket. The postcards were also cut a parts in the collection.
The pocket will hold many many photos as it will as mentioned expand. The one postcard is a booklet that will also hold photos and or journaling or both.
Love the postcards!
More of the many pages in this folio. It can be opened and viewed many different ways. 
More tags from the collection.
The 2 tags removed from the pocket and the one is stationary to embellish the pocket.
Another page/flap with a booklet.
The booklet showing the inside also has a tag. More space for journaling and or pics or both.
Another page with cut a part pockets and more of the cool number tags. 

Back page with belly band and bottom stop. The band holds a large booklet.
Back page with booklet removed to show the accented page.
The booklet
Inside the booklet.
What a fun and easy project to do especially when you have a very easy collection to work with. There is still a ton of papers and cardstock in this collection pad to make more projects. 
You can find this collection: Reminiscence the book 3 by Elizabeth craft designs at 

Materials List

  • Reminiscence Paper Pad
  • Black Cardstock
  • Basic Grey Magnets
  • Art Glitter Glue
  • Black Ink
  • Black Flat Back Pearls
  • Black Seam Binding
  • Glossy Accents
Cutting Guide

5) 8 1/2 X 11 Black Cardstock for base folio pages
A. Score (1) with 11" across the top at: 1" . 7" . 8"
B. Score (1) with 11" across the top at: 1" . 6 3/4"
C. Score (1) with 11" across the top at: 3" . 4" . 10"
D. Score (2) with 11" across the top at: 2" . 8"
Assemble
Attach B. to C. joining the 1" score to the 10" score do not overlap the score lines so it folds easily and isn't obstructed.

Attach D. to C. joining the 3" to the 8" scored areas careful not to overlap your score lines.

Attach D. to previous D. joining at the 2" scored areas careful not to overlap your score lines.


Fold the 4 1/4" panel in first, fold over. Bring the right side up and over at the 1" score, fold over, fold back and end as shown with 3" flap on top. 


I chose to add some magnets to the front flap and to the inside portion since I expanded the folio. This helped to keep it all together nicely.


Box Cutting Guide

1) Black chipboard 9 X 6 1/2
2) Black chipboard 6 1/2 X 1 1/2
2) Black chipboard 1 1/2 X 9
These will make the box . I used Artist Tape (black) to assemble the box.
Lid

1) Black chipboard 9 1/2 X 7


Youtube Walkthrough: