Pages

Sunday, December 12, 2021

 Shadow Box Album

What a fun and different project. This design team project for The Rubber Buggy was created as I went along and I had to change it up as I got ahead of myself, so plan 'B' became the end result....but I like the end result thank goodness!

I used the stunning 'Hours of Longing' collection by Craft O'Clock, and when I say the pictures don't do it justice, I seriously mean it.This collection is simply beautiful making it so very easy to work with. Once again Craft O'Clock has hit it out of the park with this collection!


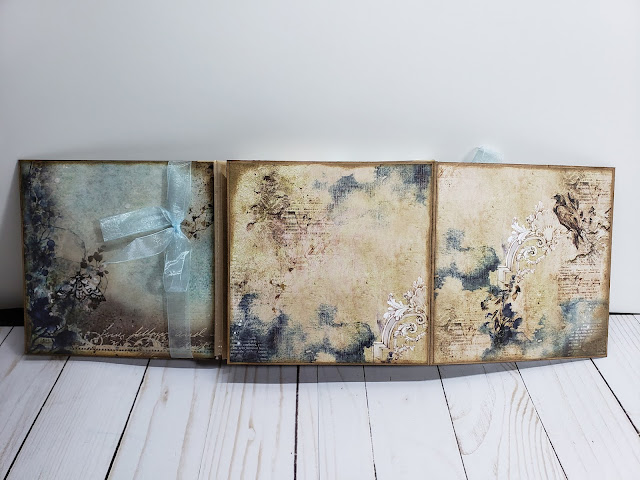
The overall album/shadow box is 6 x 6 x 1 1/2 when everything is all closed...but open it and...

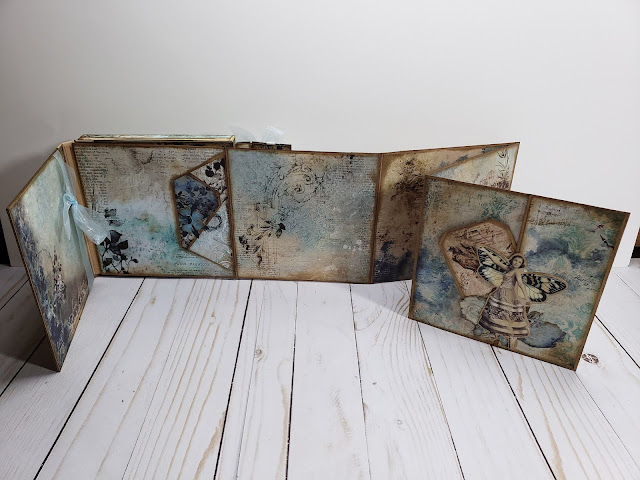
... you will reveal a long accordion fold pull out album! So much space packed into this album. The papers are just amazing and speak volumes. This is a collection that could be used in so many ways with beautiful results.
The front cover has a magnetized side flap closure which is embellished with a pretty cream colored lace with tiny flowers and a delicate sheer light blue ribbon tied in bows with a brass key fob. There is a narrow bottom shallow band pocket that I scalloped and created a double layered tag. I fussy cut the large flower from a couple of the scraps and inked it with sepia and blue ink for interest. I added a couple pieces of the lace and inked one of the chipboard vintage ladies and popped her on top. The whole album and shadow box are inked with Sepia ink for a vintage feel.

Opening the magnetic flap gives access to the album. The graphics in this collection are truly stunning! I can't recommend this collection enough if you love beautiful papers. On the inside of the cover,  I added a pretty sheer light blue ribbon tied up in a delicate bow. The blues in this collection are amazing and so varied. On the first page I added a side pocket adorned by a fussy cut flower and  vintage 'butterfly lady'. A large pretty tag was added to the pocket with room for several more. Plenty of space for journaling and/or photos.

Turning the page to another pretty set of graphics. I added another side pocket on the left hand page and created a nice big tag. I added some scraps from the collection, leaf stems and a blue simple flower all inked with sepia ink. I then inked another of my 'butterfly ladies' and set her on top finishing the tag.
Another flip and yet more pretty pages.  A bottom corner pocket holds another decked out tag layered for dimension. Gorgeous graphics.

Omg, I really love these 2 pages. I love the graphics and how the sheer blue ribbon is doubled up and tied in a pretty bow. I love the vintage butterfly lady on the right page that I used as a 'pocket' to hold another simple tag. I added some scrap piece from the collection as well as a stem...inked in sepia and thought it finished nicely.
Opening the album from the other side (since it is an accordion fold album), shows all new pages. Lots of space in this creation!.
More pages from the other side....a pocket with another pretty embellished tag, layered flower with a delicate stem. The pocket is large enough to hold several more tags and /or photo mats.
Opened it's quite large all nicely folded and secured with the magnetic side flap on the front.
Flip the album to the last page and voila! you will expose the shadow box.  I have created this shadow box using a stretched canvas flipped over so the backside has the the hollow square section. I papered the canvas and inked it all.  I layered flower components to add dimension and pick up the theme. Inside the shadow box I have added paper of course and a clock face with hands. The vintage 'butterfly lady' is popped forward to allow for dimension to the box.
The back of the canvas shadow box and all the sides have been papered and inked to finish this creation.
This amazing collection: Hours of Longing by Craft O'Clock can be purchased at Therubberbuggy.com

My youtube walk through:

Materials list:

* Hours of Longing 8 x 8 paper pad
* Craft cardstock
* 6 x 6 Artists Loft Back Stapled Canvas
* Prima Sepia Ink
* Distress Ink Midnight Blue
* Light Blue Sheer Ribbon
* Cream colored embossed Lace
* Bronze Key (from my stash)
* Ephemera pack flowers from The Rubber Buggy
* Vintage chipboard Butterfly ladies (from my stash)
* Bronze clock & hands (from my stash)
* Art Glitter Glue
* Scoretape
* Artist Tape


Tuesday, November 30, 2021

Gift Bag Toppers


How fun to make gift bags that YOU dress up to your liking, and, with cool toppers so you aren't having to stuff tissue paper into them to hide the gift. These toppers are easy peasy folks, and can be made for any size bag. For the topper, you simply measure the base of the bag (ie: the bottom of the bag when it's opened) and if it's a smallish size, add 2" to both sides and front/back. If your bag has a 4 x 2 inch base as the one above, you would cut your topper piece at 6 x 4. Put it in your scoreboard and score at 1" on all 4 sides. Place your bag on top of the topper piece (and it should fit perfectly centered) and measure in 1/8" from the edge and mark 1/8" on each side of the handle, move up 1/8" and mark again. Draw straight lines across on both marks so you know where to cut out for the handles. Turn and repeat on the other side for the other handle. You can use pattern paper and make it all one piece, or cardstock and glue pattern paper to each section of the topper. Cut up on all four sides from just to the score line as these will fold in and be glued to make your topper. Measure the overall bag and cut the decorative papers to finish it. The above bag overall measured 4 x 5 1/4, so I cut the decorative papers as follows: (2) 4 x 3 3/4, (2) 3 3/4 x 3/4. 
Such an easy easy way to make super cool gift bags! Tie a pretty ribbon with a gift tag around one of the handle pieces or glue a tag to the bag front, and voila! A one of a kind!!!

Material List

* Gift bag
* Pattern Paper (Cosy Winter by P13)
* Art Glitter Glue
* Decorative edge punch 

Cutting Guide

(For the above Cosy Winter Bag)

(1) Pattern Paper Topper: 6 x 4 Score at 1" on all sides
(2) Pattern Paper 4 x 3 3/4
(2) Pattern Paper 3 3/4 x 3/4

Youtube tutorial:

https://www.youtube.com/watch?v=8ybsSnudx0U&t=10s


Monday, November 29, 2021

 Cosy Winter Never Ending Card

Above I am showing the card and envelope.

This collection Cosy Winter is the perfect collection to use in card making. This pad was a 6 x 6 and since the overall card measures 6 x 6 it worked perfectly. It's that time of year when the winter is creeping in and the graphics in this collection show a beautiful way to express it. I used some red Stickles to add tiny sparkly berries to the card. The 'never ending' card is just that.....never ending. You can flip and flip and flip and see pretty scenes throughout each time. 


The envelope was made using the We R Memory Keepers Envelope Punch Board. I fussy cut the rustic wagon from the collection to add some dimension and interest to the envelope and tie it together with the card. Red Stickles was used to add the tiny berries on the foliage for a little pop here and there. The card fits perfectly in this envelope.


Just a little close up to highlight the tiny red berries. I put some on each section.
By flipping open you find another scene and this one has small pockets that hold small tags that were cut from the ephemera page in the collection. 

The pockets and tags are large enough to add sentiments or notes to the card making it a personal card.

Flip again, and yet another pretty scene....hence the name 'never ending' card.

Such pretty graphics in this collection. I love the winter graphics in this collection.

I again cut some of the ephemera and used the tags to add more interest and the ability to make this a personal card.

Back to the beginning of the card and the envelope I made using the We R Memory Makers Envelope Punch Board. 


I added another fussy cut piece from the collection on to the front of the envelope and added some red Stickles to pop those little berries out on the envelope.

Materials List

* Cream Cardstock
* Cosy Winter 6 x 6 Paper Pad by P13
* Art Glitter Glue
* Scoretape
* Prima Sepia Ink
* Green Ribbon
* Red Stickles

CUTTING GUIDE for 6x6 COSY WINTER

Never Ending Card

Cardstock: 

* (4) 3 x 6

    Score all 4 pieces on long side at: 1 1/2 & 4 1/2

Pattern Paper:

* (8) 2 7/8 squares

* (4) 2 7/8 x 1 3/8

* (8) 1 3/8 squares

This makes a perfect 6 x 6 card. Decorating as you like and adding additional elements can change the card significantly.

I used the We R Memory Keepers Envelope Punch Board to create the envelope. I fussy cut an element from the collection to add to the front of the envelope for dimension and interest. 

The youtube link for the tutorial is below:

     https://www.youtube.com/watch?v=BkRB6tflU-Y


Thursday, November 18, 2021

Force Of Gentleness


 I created this fold down booklet using the exquisite Force Of Gentleness collection by Craft O Clock. This is my first Design Team project for: The Rubber Buggy. It is a very pretty feminine collection that flows nicely making it a dream to use. I will put a link below to their store so you can check out this awesome collection from Poland.                              The booklet measures 8 1/2 x 8 5/8 x 1 1/8 when closed. I adorned the booklet with a sheer yellow ribbon and pretty yellow flowers to compliment the floral design in the papers. I added a stamped 'Memories' matted in black cardstock and encircled with pretty little yellow beads for interest. The top flap is magnetized and snaps closed easily keeping all your precious photos and journaling safe inside the booklet.


Opening the booklet, each page pocket is decorated with the beautiful papers. The pictures just don't do these pretty papers justice. This booklet has the ability to house several photos and/or journaling. A pretty feminine booklet.


Each page has a pocket that holds photo mats and can easily hold many more. I fussy cut some of the graphics to create a standout appearance on the top of each pocket.

Pretty pretty pretty is how I describe this collection. I fussy cut the top portion of this ballerina so she 'stood out' a bit more. Since this pattern had a lot of what looked to be black threads tied in pretty bows, I decided to use some black embroidery floss to capture some of that detailing on the pocket. Inside the pocket are more photo mats and a small little booklet.


The small booklet is set off by some yellow embroidery thread. 


The large photo mat is shown pulled part way out of the large page pocket. I have also put a tab on top of each to make for easier removal. So much space for photos and journaling.


This page graphic is a beautiful horse with it's mane flowing in the wind. I fussy cut above his mane to add some detail. Several photo mats and a small booklet resides in this pocket.


A closer look at the pretty graphics and the large photo mat partially pulled to show. Yellow sheer ribbon bonds the pocket and page together.


Check out the pretty dancer with her arms reaching the sky. Fussy cutting around them helps to make them more prominent. Photo mats and a booklet is housed in the pocket with room for many many more. A large photo mat is partially exposed to show. 
I truly was impressed with this collection, and used an entire 8x8 pad with this project. I can't tell you how easy a beautiful collection makes it to use.

This beautiful collection is Force Of Gentleness by Craft O Clock and can be purchased at:
www.therubberbuggy.com

My youtube walk through can be seen here: https://www.youtube.com/watch?v=2sKFdwHyfEc&t=36s

Cutting Guide
Miscellaneous:

*Black 1" Artist Tape
*2 large Magnets
*ScoreTape
*Art Glitter Glue
*Black Ink
*Yellow Sheer Ribbon
*Black & Yellow Embroidery Floss
*Yellow Beads
*Stamp Sentiment of your choice

Chipboard:

Black Chipboard as follows:

2) cut 8 1/2 x 8 1/2 (front & back covers)
1) cut 8 1/2 x 1 (Base/Spine)
1) cut 8 1/2 x 3 1/2 (closure flap)

Cardstock:

Black Cardstock as follows: 

1) 8 1/2 x 1 (with 8 1/2 across the top score @ 3/8 & 5/8 will attach the closure flap to the front and back pieces
4) 8 1/2 x 8 1/2 (Inside and outside of the front & back covers)
2) 8 1/2 x 3 1/2 (flap front & back)
2) 8 1/2 x 1 (Base/spine inside & outside)
1) 8 1/2 (cut a sliver off this length) x 3 1/2 (score every 1/2") Hinge
Cardstock Pages:

Black Cardstock as follows:

1) 9 1/2 x 8 1/4 (with 9 1/2 across top, score at 1/2 & 9)
1) 8 1/4 x 8 1/2 (top piece of the above pocket page)
1) 9 1/2 x 8 (with 9 1/2 across top, score at 1/2 & 9)
1) 8 1/2 x 8 (top piece of the above pocket page)
1) 9 1/2 x 7 3/4 (with 9 1/2 across the top score @ 1/2 & 9)
1) 8 1/2 x 7 3/4 (top piece for the above pocket page)

Cardstock Page Pockets:

Black Cardstock as follows:

3) 9 1/2 x 4 (score 1/2" on both short sides and on 1 long side)

Pattern Papers:

I cut my pattern papers 1/4" smaller than the page base or as you like your border to be. Tags and small booklets the sizes you prefer and as many as you would like. The large photo tags inside the large page pockets measure 8 1/4 x 7 3/4 with a small tab on top. These needed to be shorter so the magnets would allow the flap to close and seal properly.


/

Friday, October 8, 2021


Like Bees to Honey2 Altered Cigar Box & Album/Folio

This was such a fun and easy project to do. The collection was so easy to work with. I've never really done much with digital collections, so this was a first for me, but love how it turned out.

I have a ton of cigar boxes that I pick up at flea markets, auctions and antique shops, and I love altering them and of course repurposing them. So, this time, I used the very cool Like Bees to Honey2 collection I printed out and totally covered the box....top, sides, bottom and insides. I added a jeweled bee to the top along with a black ribbon trimmed in gold and on the other side some flat back jewels in a 'bee' brown color. I also added a pull to open the box and used some flat back pearls in place of brads. I adhered the elements to the box top using Glossy Accents as I've always had such good luck with it keeping items in place without any movement at all.


The feet had of course to match the theme 'bees', so I had to make sure to color them with black and a gold band. The very cool papers I used around all the edges of the box has bees.

The bottom is also papered in a bee print.

I did something a little different with this one, I used the open lid of the box to be a base for a pretty cool 'pop out'. It is secured by a pretty black ribbon tied in a bow. The album/folio is still in the box waiting to be shown.

Untie the ribbon and get ready to open:

Presto! I just love this pop out! An easy to add piece that can hold of course 4 panels for pics....or journaling. I thought adding the bee pics just went perfect with this album.

What a fun fun album/folio! This collection sure makes creating easy. This album measures: 5 1/4 x 7 3/4 
I fussy cut the added flower and leaves to place on top of the black ribbon down the right side. I also fussy cut one of the bees from the cut a parts in the collection to use for some dimension.

Showing you the pages of this pretty cool album/folio.


I hope you enjoyed this project. I will be posting more very soon, as I have so many I want to do! Stop back soon, so you won't miss any and follow me here for your convenience. You can catch my walk through of this project on my youtube channel, link is below!