Expanded Folio in a Box
This is my Design Team project for Pear Tree Treasures using the very cool collection: Reminiscence the book 3 by Elizabeth Craft Designs.

This is the box I made to hold the 'expanded folio'. I love this collection as it has to be one of the most versatile collections ever. This paper pad has not only 'papers' but patterned 'cardstock' as well. How cool is that!
The box measures 9 X 6 1/2 X 1 1/2. I added some pretty black seam binding (a double row across the top left) and gathered it in the center adding the bow. A full black flower I made and had in my stash worked perfectly for what I was going for. I did add some golden glitter to the center of the flower.

The sides are all finished with this patterned paper. The lid was purposely made a bit larger as I wanted a slight over hang on the sides and front.

The bottom of the box with the pretty patterned paper. There was so many papers to choose from, the hardest part of this project was deciding which papers and cardstock I wanted to use.

Lifting the lid and revealing the inside of the box. The opened lid was decorated using the same patterned piece as the outside with some pretty black seam binding across the top left. One of the cut a parts (# 4 ) was also used. All of the tags and cut a parts used are in this collection.
The 'Expanded Folio' inside the box. I normally put some ribbon in the box and cross it over the albums or folios to allow for ease of removal. It just makes it so much easier.

The cover of the Expanded Folio. I really loved the patterned paper here and wanted to make sure to use it on the folio cover. I inked everything throughout with black ink and used black cardstock to base it all. The chipboard used for the box is also black. I didn't want to cover up the graphics on this cover, so I only added the 'This moment' cut a part and accented it with a black flat back pearl. I also wanted to make the flower pop, so I used the various sizes of black flat back pearls to make the flower centers stand out.


The tag was matted with black cardstock.
So many pages in this folio and all have pockets with extras for journaling and/or photos.

Pocket contents.

Belly band with a matching bottom pocket.

Contents of this page. The #1 and #12 are booklets.

The booklets have stops inside to hold photos or journaling.

This page has 3 pockets and they are magnetized so they can be removed and easily put back safely in place. These are all in the collection.

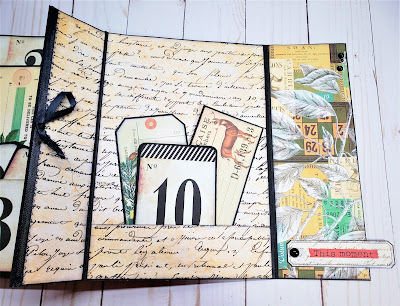
I love how this page turned out. Look how much it has to offer, plenty of space for several photos and or journaling. I love all the number cut a parts.

This page has an expanded pocket. The postcards were also cut a parts in the collection.

The pocket will hold many many photos as it will as mentioned expand. The one postcard is a booklet that will also hold photos and or journaling or both.

Love the postcards!

More of the many pages in this folio. It can be opened and viewed many different ways.

More tags from the collection.

The 2 tags removed from the pocket and the one is stationary to embellish the pocket.

Another page/flap with a booklet.

The booklet showing the inside also has a tag. More space for journaling and or pics or both.

Another page with cut a part pockets and more of the cool number tags.


Back page with belly band and bottom stop. The band holds a large booklet.

Back page with booklet removed to show the accented page.

The booklet

Inside the booklet.

What a fun and easy project to do especially when you have a very easy collection to work with. There is still a ton of papers and cardstock in this collection pad to make more projects.
You can find this collection: Reminiscence the book 3 by Elizabeth craft designs at
Materials List
- Reminiscence Paper Pad
- Black Cardstock
- Basic Grey Magnets
- Art Glitter Glue
- Black Ink
- Black Flat Back Pearls
- Black Seam Binding
- Glossy Accents
Cutting Guide
5) 8 1/2 X 11 Black Cardstock for base folio pages
A. Score (1) with 11" across the top at: 1" . 7" . 8"
B. Score (1) with 11" across the top at: 1" . 6 3/4"
C. Score (1) with 11" across the top at: 3" . 4" . 10"
D. Score (2) with 11" across the top at: 2" . 8"
Assemble
Attach B. to C. joining the 1" score to the 10" score do not overlap the score lines so it folds easily and isn't obstructed.

Attach D. to C. joining the 3" to the 8" scored areas careful not to overlap your score lines.


Fold the 4 1/4" panel in first, fold over. Bring the right side up and over at the 1" score, fold over, fold back and end as shown with 3" flap on top.


I chose to add some magnets to the front flap and to the inside portion since I expanded the folio. This helped to keep it all together nicely.


Box Cutting Guide
2) Black chipboard 6 1/2 X 1 1/2
2) Black chipboard 1 1/2 X 9
These will make the box . I used Artist Tape (black) to assemble the box.
Lid
1) Black chipboard 9 1/2 X 7
Youtube Walkthrough:
No comments:
Post a Comment