Photoplay Moments Collection
Ladies Desk & Folio Album
Ladies Writing Desk (completely handmade)
Inside the Ladies Writing Desk, there is plenty of storage for pens, pencils, scissors, stapler/staples, cards, writing paper, envelopes & stamps. What a pretty place to keep it all together.
Folio Album. I love the folios.....but I am also quite partial to the mini albums....so ....I thought I would combine the two and this is what I came up with.... A Folio Album.
-------------------------
I am so happy to share my newest Design Team Projects for Country Craft Creations with everyone, as this was truly a fun fun collection to work with. The Photoplay Moments Collection is soft, delicate and feminine, I thought perfect to use to make a handmade 'Ladies Desk' and 'Folio Album'. A perfect place to keep the essentials to write notes, letters or cards all in one place. Pretty to boot, this makes for a perfect gift as well.
The Folio Album measures: 9 x 6 x with a 1 1/2" spine
Plenty of space for larger photos 5 x 7's as well as smaller pics that will fit in the pockets on each page.
Note the 'folio' construction of the album. This makes for a huge huge pullout with tons of space for pics and/or journaling, both a must of course to save for the future. Such beautiful papers to work with.
Turning one of the pages...........again, so much space in this sweet Folio Album! The cut a parts in this collection are perfect to use and on the back you can add a photo to the vintage pieces.
Another page showing the beautiful papers and the useful cut a parts. I've used them for the pockets as well as photo stops.
Another view of the Folio Album... so many ways to open and turn the pages.
Another pretty view of the pages...........flip, flip, flip to your hearts content!
Fun, fun, fun! I love the folio style of this album.
Expand, expand, expand!
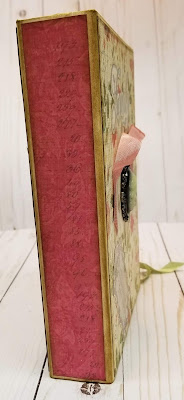
The spine of the Folio Album
I used medium weight chipboard to create this Folio Album also, and all the papers used are from the Photoplay Moments Collection. Materials List can be found below.
Inside that Ladies Writing Desk, shows the lid opened and laid back. I decorated the underside of the lid as well AND the inside of the desk. I created a divider to house the paper/envelopes on one side and pens, scissors, stapler, staples and such on the other side. Plenty of space in this desk. It measures overall: 10 1/2 x 12 x 2 1/2
Side view of the desk...........It slopes from 2 3/8" to 1 3/4" . I have inked it all for the vintage look.
The inside showing the pretty papers and some of the cut a parts used to decorate.
I used gold hinges and gold square brads as well as golden heart brads to hold the hinges in place (with a little help from crystal glaze in the holes to set it).
I hope you enjoyed these projects as I loved creating them! Below find the materials list and links to Country Craft Creations where you can find all the materials to create these projects. I have also included a link to my youtube walk through of these projects. I hope you take a moment to subscribe and if you have any questions, feel free to ask.
Materials List Ladies Writing Desk
Photoplay Moments Collection * Medium Weight Chipboard * Art Glitter Glue * Score Tape * Cream/Ivory Cardstock * Metal Hinges * Brads to attach the hinges * Embellishments of your choice * Colored Photo Holders
Materials List Folio Album
Photoplay Moments Collection * Medium Weight Chipboard * Art Glitter Glue * Score Tape * Cream/Ivory Cardstock * Colored Seam Binding
Links
https://www.youtube.com/watch?v=8j22rBUSevU&t=3s (Youtube walk through)
www.countrycraftcreations.com (All materials available here)
Cutting Guide for the Ladies Writing Desk
Overall finished size: 10 1/2 X 12
Links
https://www.youtube.com/watch?v=8j22rBUSevU&t=3s (Youtube walk through)
www.countrycraftcreations.com (All materials available here)
Cutting Guide for the Ladies Writing Desk
Overall finished size: 10 1/2 X 12
Medium Weight Chipboard
2) 2 3/8 x 1 3/4 x 10 (sides)
1) 2 3/8 x 10 (Back)
1) 1 3/4 x 10 (Front)
1) 10 1/4 x 10 1/4 (Base)
1) 10 1/2 x 4 5/8 (Stationary top of lid) For extra strength, use 2 pieces glued together.
1) 10 1/2 x 7 1/4 (Lid) For extra strength, use 2 pieces glued together.
Cardstock
Connector strips are 1" pieces scored @ 1/2"
1) 2 x 9 3/4 scored @ 1/2", 1", 1 1/2" fold and glue together to form the divider piece for the inside of the desk.
Pattern Papers
All papers are cut 1/8" shorter on all sides for decorating
*Art Glitter glue was used to attach the connector strips to build the desk as it dries quickly but does allow a little bit of 'wiggle time'.
-------------------


No comments:
Post a Comment