Good morning everyone! Today I would like to share with you my newest Design Team Creation for Country Craft Creations. I had the pure pleasure of using the Authentique Homestead Collection. If you love vintage....retro.....country....or shabby chic, this is definitely the collection for you!! I truly enjoyed working with this collection and was quite pleased with the end result. I will be offering this album for sale, it is a one of a kind keepsake. I will post links at the end to Country Craft Creations and the walk through video on youtube. I will also post a 'materials' list that I used creating this project, kick back and enjoy.


 The back of the cover is also very usable via the long side pocket with the pretty vintage lady graphic. She too is in her pretty dress and heels not to mention the always used frilly polka dot apron. Hair and makeup of course meticulously in place...serving up dinner. What a gal huh?! Inside the pocket are 4 retro cards from the ephemera in the collection. I added a red scalloped punched pull to them for an extra pop of color. The backs of these have places to make notes and/or journaling.


 Inside the cover on a piece of the spine, you will find a magnetized bookmark with a little red pull. I papered the bookmark in the fabulous fun chicken wire paper from the collection. Use it.... put it back easily and safely letting the magnet hold it in place as well as the bottom stop. The stop is from the cardstock stickers in the collection and helps to insure that the bookmark will stay securely placed.


This mini album is an 8X8 with a full 5" spine. Now that's a large spine folks, but once I open the cover you will see why it was needed. The cover is definitely vintage in theme using the beautiful plaid paper from the collection and a graphic I found online of the fabulous young woman cooking...decked out in her pretty dress and heels and sporting her always used apron. The word HOME was from the cardstock stickers in the collection, and I matted them with the same brick red Carta Bella cardstock I used on the album. Pop dotting them down the side gave the cover some extra dimension. A pretty deep brick red burlap flower I had in my stash goes nicely also. Metal utensils (knife, fork and spoon) were also added to really add some flair to the cover. I lucked out and found these in an antique shop a few weeks ago! I always have my eyes open for things I can use on future creations when I go to antique shops and flea markets. To finish the cover I also had in my stash the 'starburst' jeweled embellishments, so I popped one of those on to carry through with the vintage theme.....they remind me of the big starburst clocks and wall ornaments that were so popular way back when! There is also a tiny red jewel in the center of the clock on the vintage graphic.


The side closure is a magnetic overlapping band. I lined the 'arms' of the closure with heavy chipboard to give it a sturdier base. I used the same cool plaid paper to cover it matching the over all cover but added some extra interest. I used some of the smaller cut a parts from the 6x6 paper pad and matted them giving the magnetic closure arm even more stability and pop.

A pretty wide sheer red ribbon tied up in a pretty bow works quite well on the spine. I also added some matted small cut a parts and a larger matted ephemera card to finish the spine. Wowza, I still have amazed myself with the size of that spine, but the next photo below will show you why it needed to be so large.......

Wowza....right?! Inside the album... I honestly love love love how it turned out!!! First let's note the old potato masher (which I still use)...retro or not, it still works great. Look a how full this album is . I used the chicken wire paper to line the inside of the cover..gotta' love chicken wire! On the inside cover there resides a huge handmade chipboard accordion recipe box!! In the center of the album you will find a magnetic bookmark that snaps right back in place when finished with it. On the right side, you will find a full size 12 page (fronts and backs) album!! Yes, this creation is packed full folks!! Let's take a look at each part separately.

Inside the front cover is the permanently attached chipboard accordion file recipe box. OMG, I had this idea in my head the minute I knew I was getting this collection to work with! How handy and perfect to have so much packed in to one area. This recipe box will hold a ton of recipes. This box is handmade and papered with the chicken wire paper from the collection. Matted cut a parts adorn the top flap along with a scalloped punched tab to lift the flap. Red matching seam binding was used to finish the embellishments on the flap. The bottom of the flap has a pocket decorated with some of the cardstock stickers from the collection I matted and pop dotted on to add to the box interest. This is all just on the front of the box!! :-) Constructing the box from weighty chipboard should insure a nice longevity of use.

Opening the recipe box will reveal the bottom pocket contents as well as what's under that flap. Under the main flap there is a very cool matted embellishment. I fussy cut this from the 12x12 paper pad cover. I loved it and thought it would be a shame to throw it away...it worked out perfectly for this spot.

Look at all the pockets in this accordion recipe box! Plenty of space to store several recipes..... oh but wait.....


Inside each of the pockets I have matted a 'Recipe Planner'! I found these awesome 'recipe planners' at our local County Market last year and just knew I would use them sometime. These planners are pretty cool, as you can record so so much on them!! The mats I finally used my Cut N Boss and made fancy scalloped/lacey tops for them, I think they fit in nicely with the overall theme of this album and recipe box. There is still ample space to add more recipe cards in the pockets.

The bottom pocket on the front of the box holds several recipe cards that I did NOT mat. I wanted to ensure they would all fit nicely and also you can write on the backs for extra long recipes.


Page 1 of the album. Sharing the rest of the spine, we now begin the album. This first page is papered with the pretty barn wood paper from the collection, and is inter-active. I used a cardstock sticker from the collection to create a pull for the bottom flap. A pretty taupe colored seam binding is tied at the bottom to add some interest.


Open that bottom flap and the bottom corner pocket is exposed. Inside the pocket is a matted 4x6 recipe card that of course can be used as are all the others in this creation. There is also a large top load mat/tag. All pages are top load and have the very large mats/tags that are decorated with the papers from this collection.

Pages 2 & 3. I just absolutely LOVE this collection!!!! Look at these papers.......don't they just scream vintage/retro/country/shabby chic!! The gingham checked papers are so darn cool!!! I love how they pop against that red Carta Bella cardstock.

Page 2 turned out so darn cute I think. The black and white gingham check just blows me away with the red cardstock! I used a black and white stripe ribbon to compliment the colors on the page and my other deep red burlap flower I had in my stash. Inter-active page of course, with the top flap punched with a sweet scalloped boarder....flattering to the theme I think.

Open the top flap (which is magnetized) and fold down the bottom one to show the underside of both flaps have bellybands with matted sentiment tags from the collection I fussy cut. The bands also have a sentiment cardstock sticker from the collection to dress them up. The base page in all it's pretty gingham glory has a bottom pocket embellished with a small black and white checked ribbon. Inside the pocket are 2 matted recipe cards that flow throughout the album.

The recipe cards and goodies from the bellybands.

Page 3.. also inter-active. I love at the turn of a page, you have an unexpected surprise. This page has a cool red checked background paper and is set off with a pretty red coordinating seam binding ribbon. Setting on the page is an inter-active. Chickens are on the paper used to embellish this piece and the pretty decorative edge was made using the Cut N Boss machine and an awesome die.

Lift that pretty decorative flap to find another cool Recipe Planner.


Lift the whole flapped recipe organizer and under it is a cardstock sticker from the collection I matted and used as a stop to hold the 'Life on the Farm' ephemera card with the red seam binding pull. The other photo is of the 2 matted recipe cards that stay securely on the base page once the magnetic flap is closed, and finally the last photo is of the large top load mat/tag.

Pages 4 & 5 are fun pages.

Page 4 is based in the awesome red checked pattern paper from the collection. I have put 2 pockets on this page, using the chicken/rooster pattern paper...both are embellished with popped up cardstock stickers from the collection and are also matted. Red sheer ribbon keeps with the running color scheme.

The pockets are a perfect size for the recipe cards...and I have put one of the matted recipe cards in the lower pocket. I left the top pocket empty to allow for other recipe cards one may have or recipes clipped from magazines.

Page 5. This page is made up of farm scene paper and paper taken perhaps from a Farmers Newspaper. How quaint! I have used a cream colored seam binding to dress up the page and flap along with 2 adorable ceramic roosters from Country Craft Creations. Too stinkin' cute!
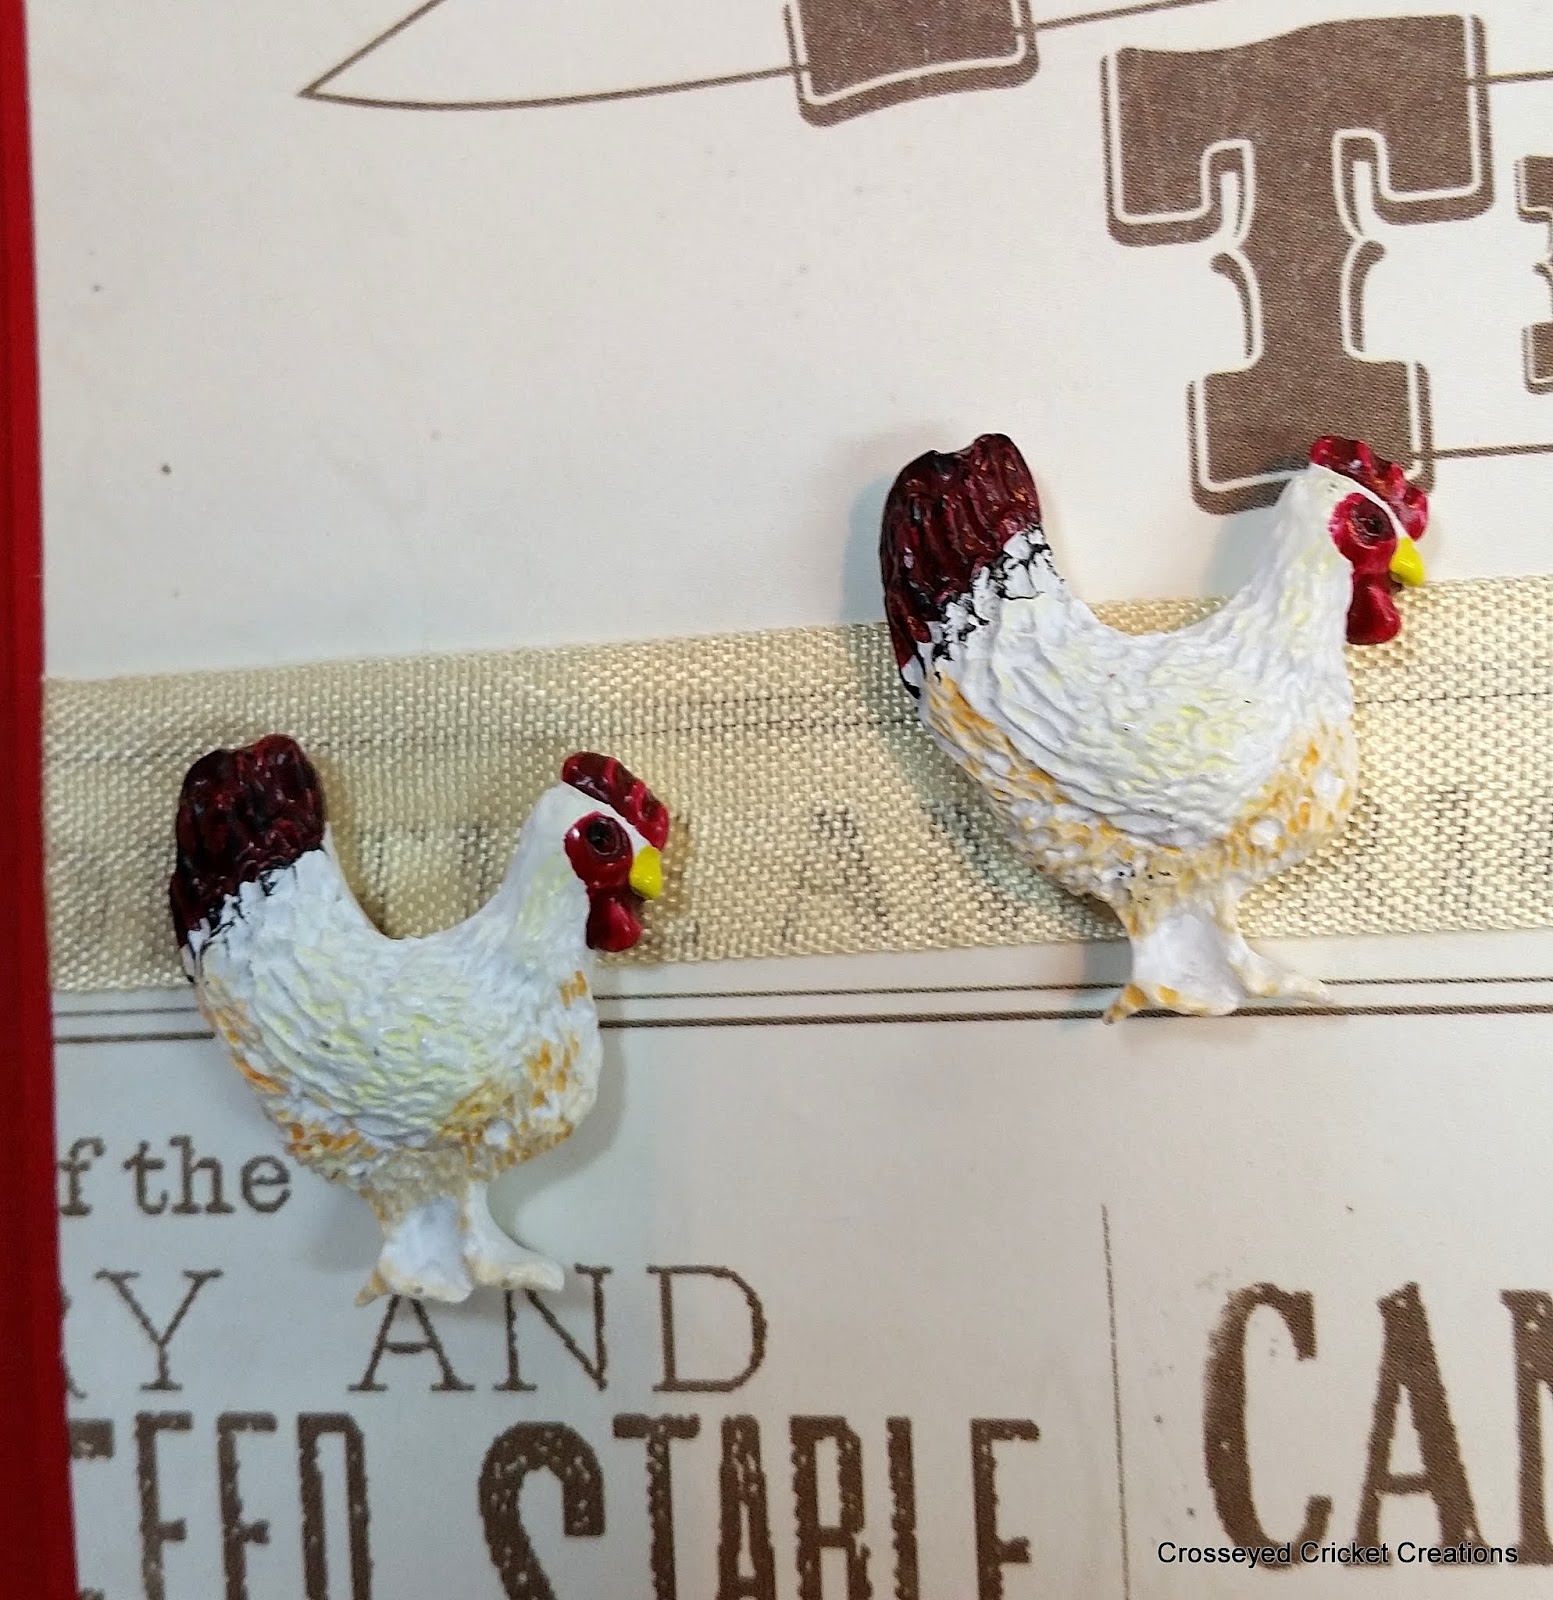
Aren't these cute! These compliment the facing page with the chickens/roosters on that paper.


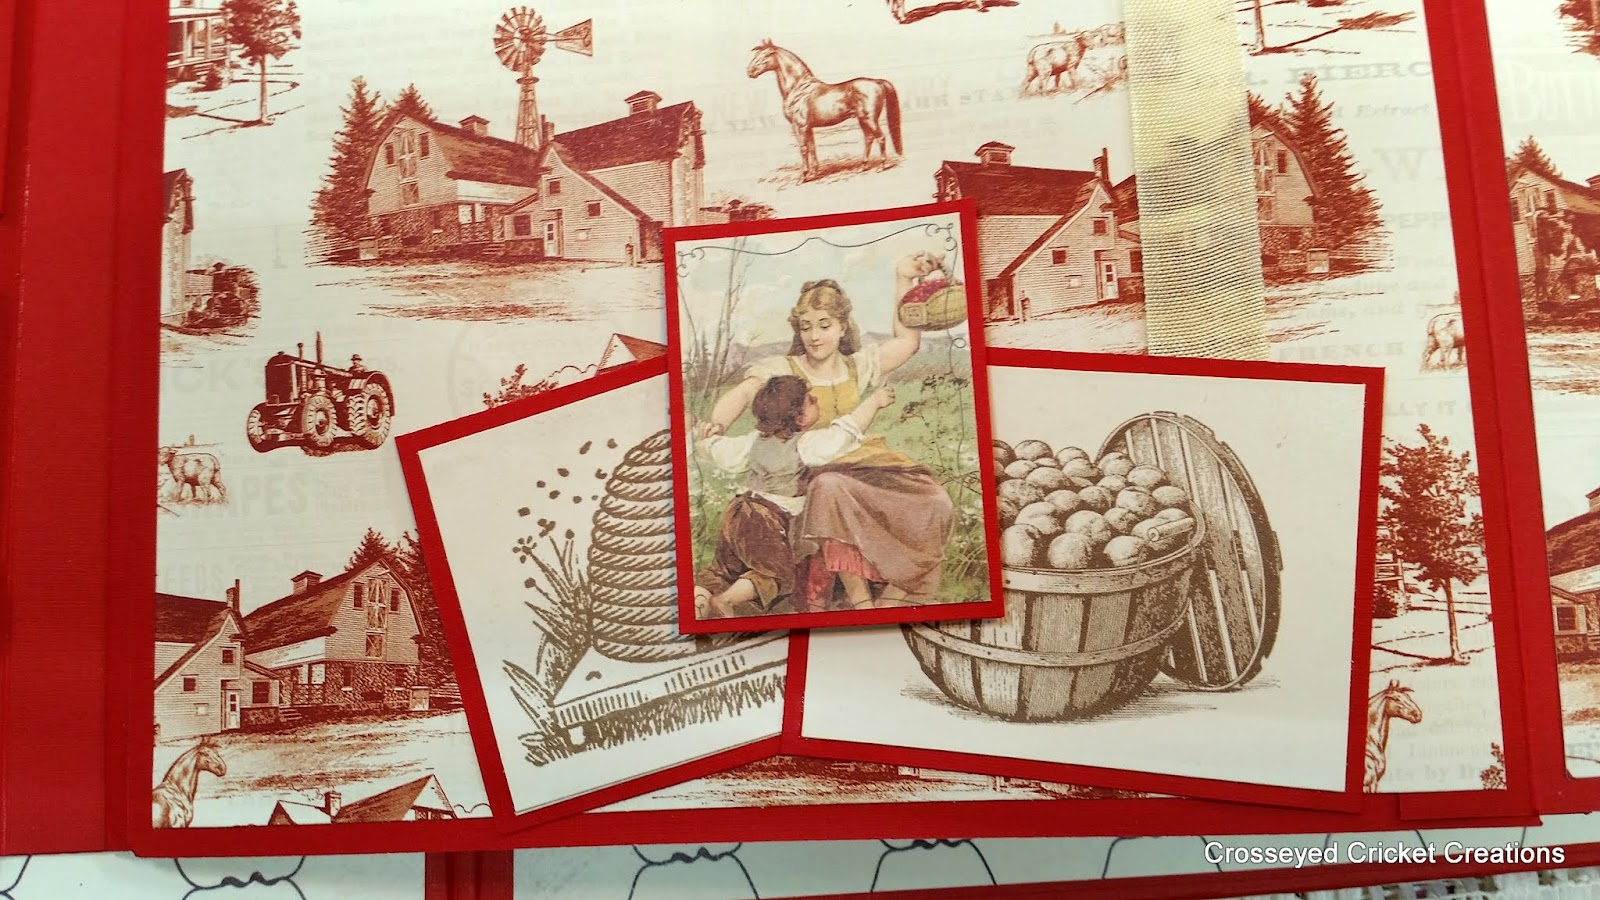
Open the magnetic flap and you will find stops on the base page as well as on the inside of the flap. Both hold a matted recipe card. Above is a close up of the stop on the base page. I loved the bushel basket and beehive from one of the sheets of paper in the collection, so I cut them out and matted them along with one of the cut a parts to create the stop.

The large top load mat/tag from this page.

Pages 6 & 7. More fun interesting pages.


This page has a long side pocket with a pretty brownish colored sheer ribbon tied up in a bow to highlight it. Inside the pocket is a booklet with a pretty cardstock sticker from the collection on the front and some of the red seam binding ribbon ...just a few small pieces to set it off. Inside the booklet are 2 matted recipe cards.

Page 7. This page is YES, inter-active. The base paper is the cool old barn wood paper from the collection ...see the old nail heads running down the side. On top of the base page, I have created a folder over card that I matted and embellished with 2 of the cardstock stickers that were also matted and ribbon pulls attached although they are stationary. I have used a magnet to hold it onto the page making it easily accessible to remove write on and snap back to the page.


Un-loop the embroidery thread from the holder and open the card..inside is bottom pocket that holds a small sentiment card with a jeweled pull. The pocket is embellished with matted cardstock sticker from the collection and a sentiment from the paper. The above photo shows the top load large matted tag embellished with paper from the collection.

Pages 8 & 9.

Page 8. Simple, but awesome! This page is papered in the barn wood paper from the collection with a difference! Where the nail heads were printed on the paper, I punched tiny holes and inserted copper colored brads to resemble the nail heads and give the simple page some POP! A matted cardstock sticker from the collection decorates the bottom pocket nicely. Inside the roomy pocket is a matted recipe card with a red cardstock pull. Simple....but nice.


The matted recipe card from the pocket...plenty of room in that pocket for lots more recipe cards. The bottom picture is a close up of those cool copper brads I used for 'nail heads'.


Page 9 has a bottom slash pocket with 3 matted cut a parts to dress it up. The base paper is farm critters dressed in an array of color, most of which are patterns from the papers in the collection. A cream colored seam binding ribbon runs the length of the page. The top load mat/tag is also shown. Inside the pocket you have 2 nice sized cut a parts that have been matted and ribbon pulls attached. Also the mats are long to allow for a writing space at the bottom.

Pages 10 & 11. Love these pages also! Very inter-active folks.

Page 10. This page has a top magnetic flaps (I make most of my flaps magnetic) with a pretty light blue patterned paper from the collection. Reminds me of a quilt pattern. I used a cream seam binding to decorate the flap and another of the cardstock stickers that I matted using a scalloped punch. It also serves as a pull to lift the flap.


 |
Lift the flap...and underneath you will find the base page papered in a livestock paper from the collection. Very cool! There is also a bottom bellyband with some of the copper brads decorating it, which holds 2 of the large ephemera cards I matted. I made the long mats again to accommodate making notes. I also just love how the long mats look...........just my opinion. :-)
Page 11. One of my favs! This page is actually a side waterfall page. What I like about this page is I used that neat barn wood paper from the collection and on each page of the waterfall I used the copper brads to simulate the nail heads. Taupe seam binding ribbon plays perfectly in to the color scheme!
  
3 waterfall pages each one with the copper brad (nail heads)! Love that look! on the last page is the base page. Polka dot paper from the collection worked out perfectly here and I created a side pocket to go on top. The barn wood paper with the popped up nail heads looks awesome here.
  
In the pocket you will find recipe booklet. A matted recipe card on the outside cover of the booklet, and inside there is a pocket that holds 3 cool ephemera cards. I left these unmated because the backs all have something of interest on them and can be written on specifically. The inside cover of the booklet has a side sentiment stop and also holds a vintage ephemera card. A checked matted arrow decorates the bottom pocket in the booklet. Polka dot paper also adorns the inside of the booklet.

The large top load mat/tag from this page.

Page 12 & the inside of the back cover.

My all time favorite technique as you all know is the waterfall!! So much real estate in such a small area....love it! So, on the last page is my full water. This baby is full too! A magnetic band closure adorned with a metal knife from the antique spree and a sentiment cardstock sticker that has been matted finishes off the décor on the band. I punched the scalloped edge on to the band to coordinate with the rest of the album for a nice continuous 'flow'.

Open that magnetic band to access all the wonderful recipe cards!!

Lift that last recipe card in the waterfall to find yet more surprises! On the underside of the waterfall mat, there is a super cute bottom pocket adorned with red checked paper and the polka dot paper. A sentiment cardstock sticker from the collection dresses up the pocket that holds 3 more of the cut a part cards that have been matted. A darker taupe seam binding ribbon adds to the look on the pocket.

A closer look at the contents of those pockets.

The inside of the back cover features a handmade large envelope that holds a 6x6 card. I used a recipe paper from the collection and matted the envelope in the beautiful Carta Bella brick red cardstock. This envelope is stationary and will not come loose. The pretty red seam binding ribbon tied up in a bow, keeps the envelope closed and contents safely inside. What a great place to store 'handwritten' recipes from family or friends that you want to keep forever! I also added one of the jeweled starburst embellishments to the bottom corner of the envelope just to add a bit more interest. I love it against that chicken wire paper!!

Untie the ribbon to access the pretty handmade card inside. The pretty cardstock sticker sentiment from the collection just completes the card.
I sincerely appreciate you folks taking your precious time to view my blog. I welcome all comments and questions, and will always respond. Please take a moment to click on the following links to my youtube channel where you can view the walkthrough of this fabulous album and you can also subscribe there not to miss any of the great upcoming projects planned. You will also find a link to Country Craft Creations where you can find all the material to make this creation. Tamra will be happy to help you, and my friends, the woman is lightning fast when she ships out! Amazing!! A materials list is also provided for you below:
MATERIALS
*Authentique Homestead Collection 12x12 paper pad, 6x6 paper pad, Cardstock Sticker Sheet & Ephemera Cards* Carta Bella Brick Red Cardstock* Colored Seam Binding to match* ScorTape* Glossy Accents* Medium Weight Chipboard* Ribbon* Burlap Flowers* Basic Grey Magnets large & small* Antique Shop find metal silverware* Jeweled Embellishments*
YouTube Video Link
|
Materials link:
No comments:
Post a Comment