Pages

Tuesday, June 8, 2021

Flutter Waterfall Album


Normally I am not one to get excited over using flowers, but I had some of this collection left: Graphic 45 Flutter and knew I had to do something with it. Soooooo..... this album came to life. This is a large album measuring 8 1/2 x 10 1/2 and is quite bright and busy, but I think that is the way this had to be. 
On the cover I have of course a sheet of the beautiful Flutter pattern paper and used an ivory cardstock for the base of the album with everything inked in Sepia (I prefer to ink my albums as it just gives it a finished look to me). I added a beautiful jeweled butterfly as this collection has several through out as well as a jeweled dragonfly. The large metal flower was an after thought, as it came from an auction in a metal frame, so I had my hubs cut it out and I thought omg, perfect for the album cover (you never know where you will find some items to repurpose and spark your imagination). In the center of the large metal flower, I added a cardstock flower since the center was bare to finish it off. On the spine I have added some red ribbons...but may change those out..still debating on that element. 

I do believe I will be changing that ribbon, I think it needs to be 'fluffier'....I will have to stare at it for a while longer to decide what to do with it. 


This is the inside cover. I wanted to add a see through pocket so you could see what was in it (makes sense right?), so I used some acetate to make the window and added some jeweled flying pretties (dragonfly and butterfly) on the pocket. It is a good sized pocket and is an expandable pocket so it can hold quite a few tags or pictures. With the album being so floral, I used an edge punch to make the flap a bit more feminine and it has a magnetic closure to keep everything in place. On the inside cover is also a pretty 'sheer' butterfly. I have added butterflies to every page as they are prevalent in this collection. 


The flap opened and the large cards removed to show the inside (yes I even decorated the inside of the pocket).


The pocket open and the 2 large cards/tags/mats shown. Such a beautiful collection and I really like this acetate pocket.


Page One. There are only 3 pages to this large album, but each page has a waterfall on it. I always try to incorporate a waterfall into my albums because they take up such a small space but provide a vast amount of space for pictures. I made each waterfall to accommodate 4 x 6 pictures, so there are 4x6 waterfalls in the landscape mode as well as 4x6 waterfalls in the portrait mode. There are a total of 3 of each...6 waterfalls in all. That's a lot of pictures!!!!! Each page also has a large pull out pocket complete with a magnetic closure to hold larger photos, letters, or anything you want to store in them. The flap as you can see folds over the page and appears as an 'envelope'.


The large pocket pulled partially out and opened to show it's size and flap.


Wowza! Now that's a large pocket folder! It will hold lots of larger photos, letters or any other memorabilia you would like to save in the album.


Pages 2 & 3. 


On this page (2) as you can see there is another waterfall and this one is in the 'portrait' mode. Also on this page as with all of them, there is a pretty butterfly gracing the page among all the ones in the pattern paper. This collection is so colorful and busy, but sure does work well together!


Page 3. As before another waterfall and this one is of course in the landscape mode. Another large pocket folder to hold those large items. I alternated between the landscape mode and portrait mode for the waterfalls. The next pics will be of the pages that follow and are in the same format.


Pages 4 & 5


Page 4. This paper is NOT from the Flutter collection, but I ran out of the florals and found this one in my stash. I thought it worked out well.


Page 5. Don't you love the bright bright colors and patterns!

Pages 6 & Inside back cover


Page 6. I tried to use a different color ribbon on the waterfalls based on the coloring in the top pattern paper piece. I also tried to use a colored butterfly depending on the background paper.

Inside the back cover. I wanted to add another place to house extra pictures, journaling, letters and other memorabilia. This envelope is large: 5 3/4 x 8, so plenty of space. The flap is tucked behind the jeweled butterfly spot closure for easy access but a firm hold to keep everything inside safe. The black sheer butterfly just looked like it belonged on this part of the album.
 
I hope you enjoyed this creation and I have inspired you in some way. Feel free to comment below and be sure to subscribe to my youtube channel. https://www.youtube.com/watch?v=1kf-0bIPB8U

Cutting Guide:
Chipboard:  (2) 10 1/2 x 8 1/2 (cover)
                    (1) 2 x 8 1/2  (spine)
Cardstock:  (2) 12 x 12 (cover)
                   (1) 10 1/2 x 4 (spine)
                   (1) 7 7/8 x 4 1/2 (hinge) Score with 4 1/2 across the top 
                   @ 1/4 * 3/4 * 1 1/4 * 1 3/4 * 2 1/4 * 2 3/4 * 3 1/4 * 
                   3 3/4 * 4 * 4 1/4    Accordion fold 
                   (3) 8 x 10 (page top piece)
                   (3) 9 x 10 (page bottom piece) Score with 9" across the 
                   top 1/2" turn 1/2" on opposite side
                   (3) 8 3/4 x 9 1/2 (Large pockets for pages top piece)
                   Score with 9 1/2 across top @ 1/2" each side
                   Score with 8 3/4 across top @ 1/2
                  (3) 11 x 7 3/4 (Large pockets for pages bottom piece)
                   Score with 11" across top @ 3 to make pocket flap
                  (3) 6 x 8 (Waterfall base for the landscape format)
                  (24) 4 1/2 x 6 (Landscape waterfall pages) Score with 6"
                   across the top @ 1/2"
                  (3) 4 x 8 (Portrait waterfall base)
                  (15) 6 1/2 x 4 (Portrait waterfall pages) Score with 6 1/2
                   across the top @ 1/2"
                  (1) 8 x 7 (Inside cover window pocket base) Score with 7
                   across top @ 6"
                  (1) 7 x 6 (Inside cover window pocket top piece) Cut out
                  center leaving 5/8" frame all around
                  (2) 5 7/8 x 4 (Sides for the window pocket) Score both
                  with 5 7/8 across top @ 1/2 * 1 * 1 1/2 * 2 * 2 1/2 * 3 *
                  3 1/2 Accordion fold
Pattern Papers: I cut my papers 1/4" shorter all around to give a nice
                  1/8" border all around
Acetate:    (1) 5 x 6
Magnets:  (3) for the large pocket flaps

Notes:

Ink all pieces before assembling as it's much easier. I used Prima Color Philosophy Sepia.

Round corners on bottom pieces of the large page pockets for easier insertion and removal.

Attach bottom page piece to hinge first then add top page piece.

Burnish all score lines and score tape.

Attach magnets BEFORE adding pattern papers to the large page pockets.

Back inside cover envelope was made using my We R Memory Keepers Envelope Punch Board. It measures 6 x 8 finished.

Enjoy!!!!!!


Saturday, May 29, 2021

Envelope Box for the Mother Goose Dimensional Book Easel Card


This is the 5 x 7 envelope box for the Dimensional Book Easel Card I did with the Mother Goose theme. It has a 1" thickness to accommodate the bulk of the card as a regular envelope wouldn't be able to handle it and would cause serious 'smashing' of the "book" feature and any extra embellishments that are added to it. The thickness can of course be adjusted to fit whatever size is needed easily. In my opinion, I would want to hand deliver this anyway, but, if I decided to mail it, I would also put this in a sturdy box as this is made from cardstock. I really like how it turned out and had to embellish the front as well as the back. :-)   

I papered the front, back, sides and top and bottom with Graphic 45 Curtain Call then grabbed the rest of my Graphic 45 Mother Goose pad and papered the front. I fussy cut some of the main paper as I wanted only certain elements to show and used some of the script nursery rhyme Mary Had A Little Lamb so that is the part I wanted to use. I also used some ribbon to finish the front. 

I used one of the Mary Had a Little Lamb cut a parts on the back (of course all the papers have been inked using Prima Color Philosophy Chat Noir) making it into a pocket. I fussy cut another section of the main paper page to get Humpty Dumpty to use as a 'tag'. I attached some of the same narrow ribbon to it for a pull.

On the back of the tag, I stamped my stamp and dated it. I'm trying to remember to date what I make.  


I collapsed the card so it would be ready to slide into the box envelope. What a fun fun project to do. Many thanks to Sam Calcott for such inspiration!!

Cutting Guide:

Cardstock:  7 1/4 x 9 1/4  (Front Piece) Score on long side @ 1 & 8 1/4 turn, score on short side @ 1 & 6 1/4

Cardstock:  7 1/4 x 9 3/4 (Back Piece) Score on long side @ 1 & 8 1/4 & 9 1/4 turn, score on short side @ 1 & 6 1/4

BURNISH ALL SCORE LINES. 

Front piece: On short end cut at both score lines up to long 1" score line. Remove the long center piece between the 2 tabs. Miter the tabs on each side slightly.

Back piece: On short end (with single long score line) cut up both scores and remove the 2 squares (one on each side). Turn to other short end (top end) with 2 long score lines and cut up at both scores and remove the 'double squares' on each side. On the very top with the narrow scored area, slightly miter both sides (this is the flap that will fold in to close the box envelope).                     Add glue to the outside flaps on each side and along the bottom. Insert this back piece into the front piece making sure the pieces are lined up and squared off. Burnish to seal the glue. Decorate as you wish. I cut papers usually a 1/4" shorter and narrower that the base which leaves a nice 1/8" all around.

My Youtube Channel:

https://www.youtube.com/watch?v=_fzINeRKY-A&t=2s

Please stop by and check out my other videos and take a moment to subscribe. I will be posting other projects very soon AND I will be doing a GIVE A WAY very very soon!!!!! 

 Dimensional Book Easel Card


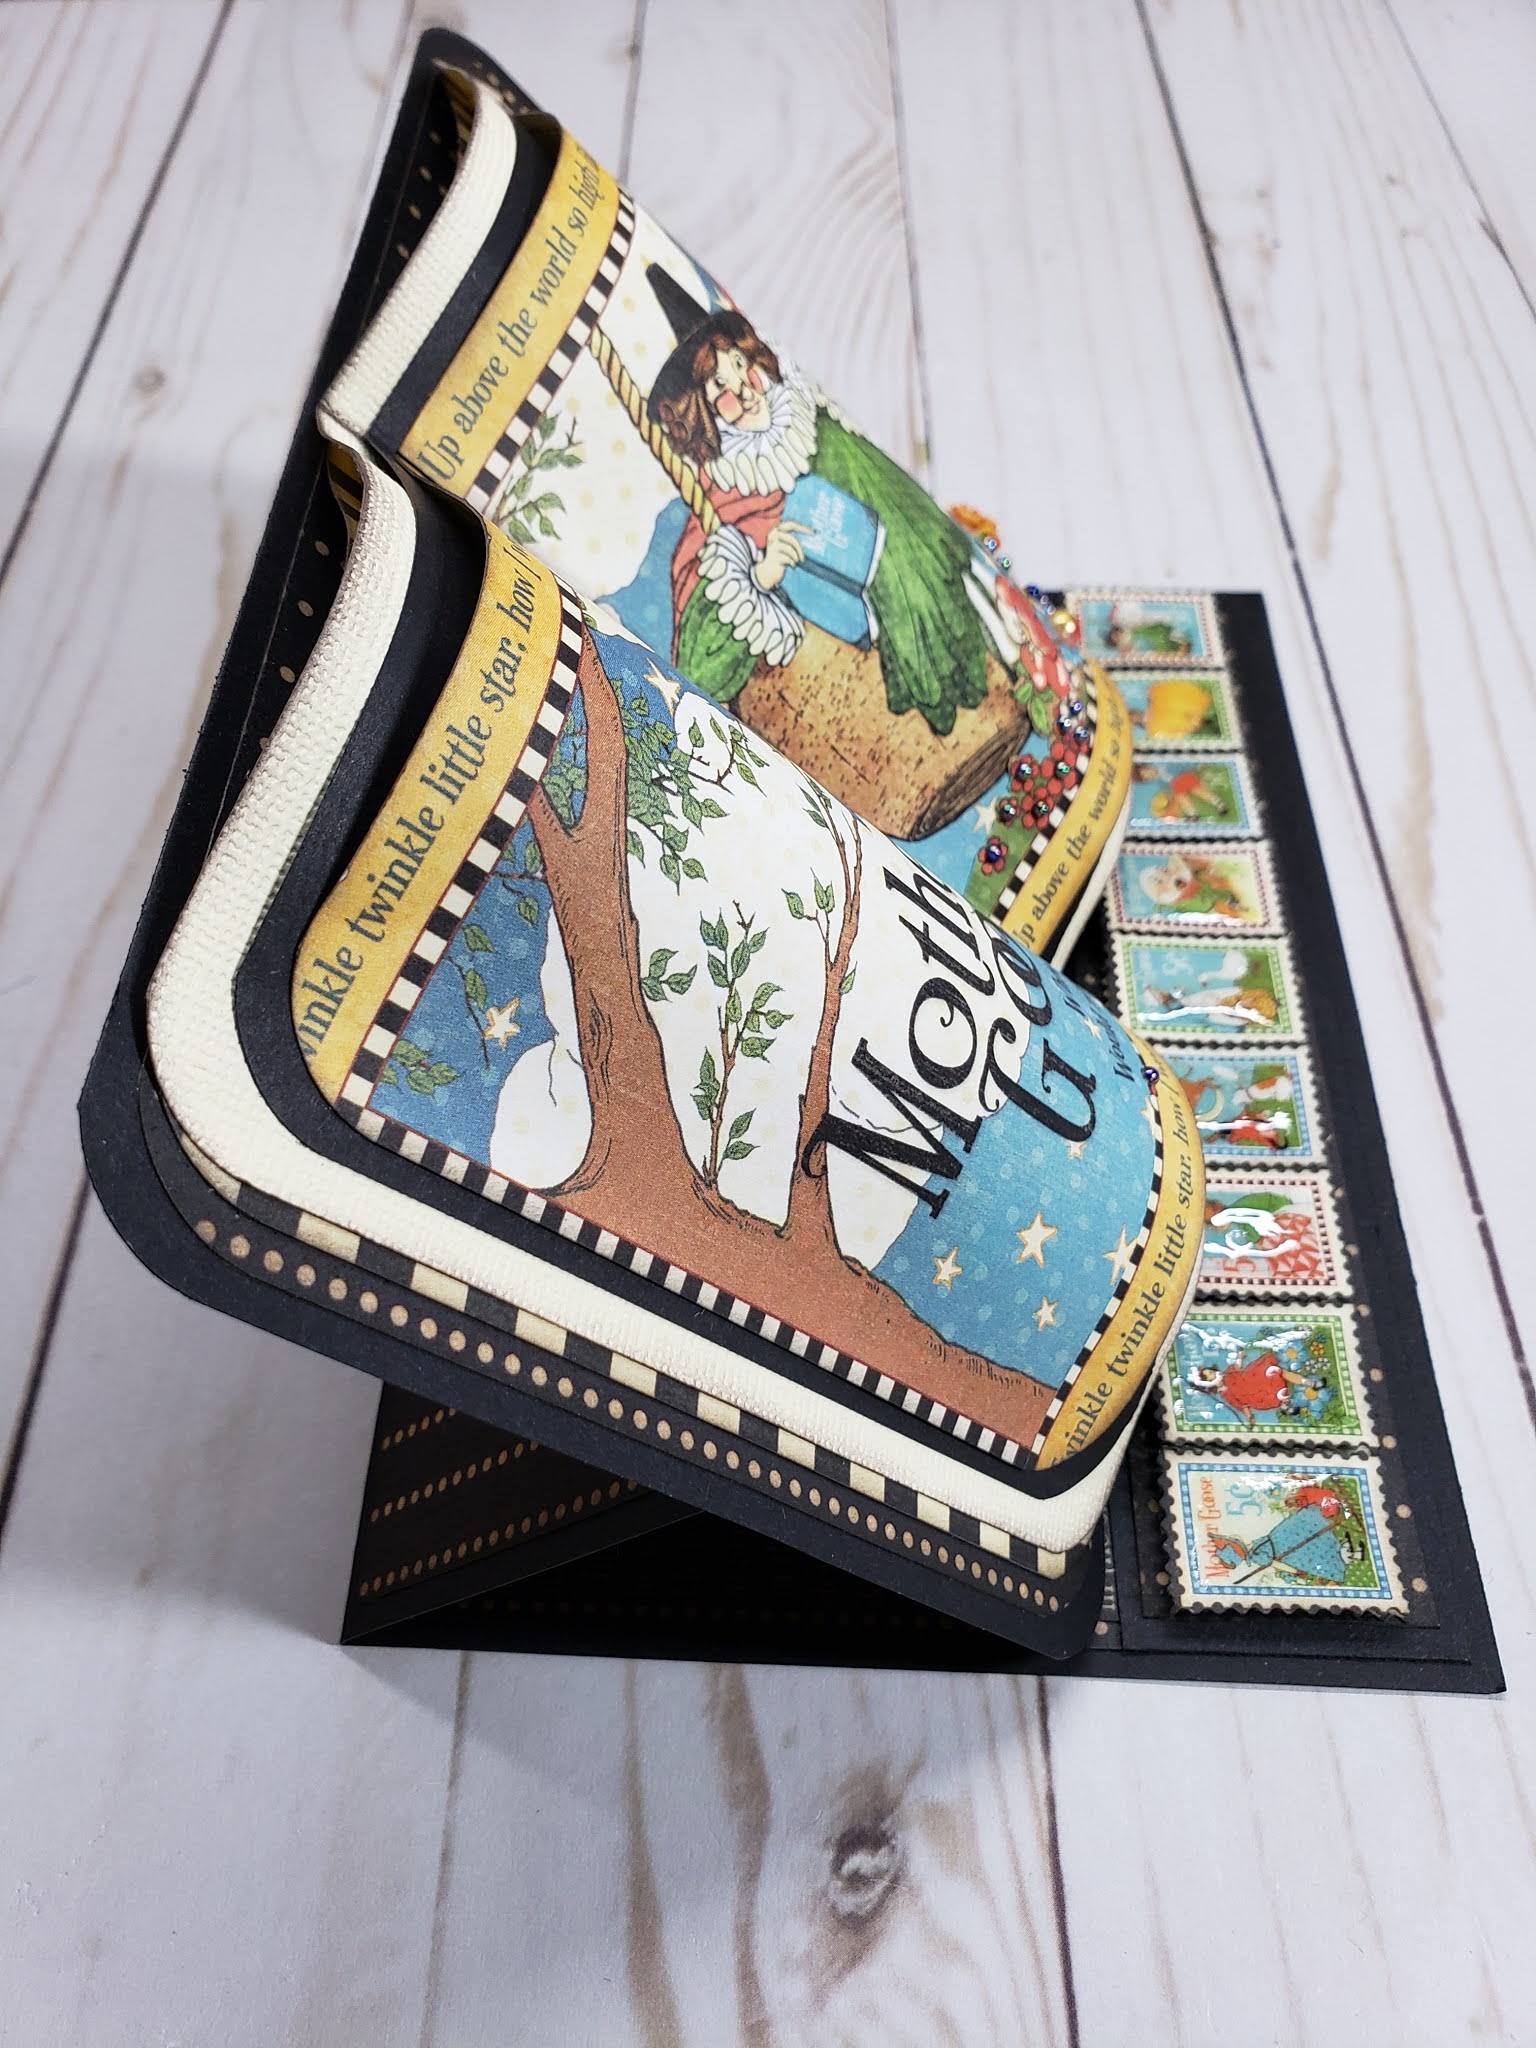
I just love how this turned out! Although it's a 'card' it certainly looks like a book with the dimension added. I also wanted some of the elements to pop, so on the bottom stop I used Diamond Glaze and covered the individually fussy cut stamps. I pop dotted these on top of the 'same' stamp strip under it. I used some of my stash of flat back pearls to add centers to the flowers and fussy cut so that Mother Goose wouldn't lose any of her wing and the flowers wouldn't lose their leaves below. I was inspired to create this book easel card by Sam Calcott, such a fun designer. I used black cardstock for my bases and used Graphic 45 Curtain Call and Graphic 45 Mother Goose to put it all together. It's so easy to combine some of the Graphic 45 collections.... I have done that several times in the past. 


Hmmmmm, the Diamond Glaze isn't showing up very well, but trust me, it sure looks pretty cool on those fussy cut stamps. The flat back colored pearls are placed and used as flower centers. I love adding dimension and seeing elements pop off the page! I'm a fool for embellishing!!


A side view of the Dimensional Book Easel Card. The stop works perfectly and it also allows the bottom stamps to also not be hidden.


A top view so you can see the depth and dimension of the book/card. 


I thought the flat back pearls made awesome flower centers!


This is just showing the book/card lying flat and not standing via the easel.


Honestly, I do love this one. Gosh, I would just about have a stroke if I received something like this in the mail! What a neat surprise it would be.....don't you agree?!

Cutting Guide

CARDSTOCK: 10 x 7 (Score on the long side: 5 & 7 1/2 Burnish)

CARDSTOCK:  6 3/4 x 1 1/2 (Easel Stop) 

CARDSTOCK:  6 7/8 X 4 7/8 (Score along the long side in half Burnish)

CARDSTOCK:  6 1/2 X 4 1/2 (Score along long side in half Burnish)

PAPERS: 6 3/4 x 4 3/4  *  6 1/2 x 4 1/2  *  6 1/2 x 1 1/4

PAPERS: 2 pieces for the very front pages: 3 1/4 x 4 1/2


YOUTUBE WALKTHROUGH LINK:

https://www.youtube.com/watch?v=_fzINeRKY-A&t=2s


NOTE:

I will be posting the cutting guide for the box envelope in my next post.


Wednesday, May 26, 2021

 Pop Up Card & Box Envelope

What a fun fun project this was!! I was on Facebook when I had a pop up hit me and it was a link to a video on making 'pop up cards & envelope boxes'. I loved that idea and the look and checked it out. Fun, fun, fun! I believe in ALWAYS giving credit to those that deserve it and would like to thank Sam Calcott for her tutorial on making both of these (the card and the envelope). I also again used up what I had left of the Mad Tea Party pad by Marion Smith to complete the project. I love how it turned out and hope you do as well. 

This is a 5 x 7 pop up card and the envelope box accommodates it perfectly. I used black cardstock as I like how it goes with the papers and I fussy cut the rabbit and hat to pop it up on the front.


What a pretty cool card to say then least. I put in 3 additional pages to the main card/book cover. I again used the Mad Tea Party papers along with some older Graphic 45 papers (Curtain Call). The two went together extremely well I thought.


The back of the pop up card.


The card in the box envelope. I used some older Graphic 45 paper (Curtain Call) to decorate the envelope and fussy cut a piece from the Mad Tea Party and matted it to add to the front of the envelope. I inked all the papers using Prima Color Philosophy Chat Noir.

The back of the envelope box I fussy cut from the Mad Tea Party pad and matted for some embellishment.


The side of the envelope box is 1" wide, with plenty of room to house the Pop Up Card without any damage to it.


A fun and quick project to do and what a cool gift to make for a special person. A Pop Up Card in any theme of your choice, works for me!!


I will be posting more projects, so please stop back by soon to check them out. There are a gazillion projects in the archives here, so take a moment to check them. 


Altered Cigar Box


What a fun project this one was. I picked up this sweet little cigar box a few weekends ago when we were out of town at a huge antique and collectible flea market. It's so perfect only measuring 3 3/4 X 5 1/2. I just couldn't resist it and it was super cheap (score!). I was looking through my stash of paper collections and came across a 6x6 pad called: Mad Tea Party by Marion Smith and knew I wanted to do something with it and since my cigar box was small, I thought this is just perfect! So, I altered the box using that collection and love how it turned out. I also inked all my papers using Prima's Color Philosophy in Chat Noir. I will be sending this one out to a swap partner this summer in an 'Altered Cigar Box Swap' and hope she likes it. I gessoed the box first then added the black coloring. Next I papered the outside and inside of the box using the Mad Tea Party papers. I did use some black 'hockey stick tape' on the hinged area to insure strength and to keep it from cracking after being used, works great. I added the heavy metal clock face and of course added the moveable hands to the clock along with a matching metal handle. On the handle I added some jump rings and had a clock charm that was perfect to go along with the theme of the paper.


I added 4 wooden ball feet that I colored black via a wide Sharpie, and attached them with my trusty Glossy Accents (which I use to attach metal embellishments, wooden embellishments or beads and laces and I find it holds super tight). 


Inside the box is papered of course with yet another one of the sweet pattern papers in the collection. Again, all the papers were inked, I just think it gives a finished appearance. 
Inside the box, I made 4 photo pouches/boxes, They will each hold about a dozen pics easily. I tied them together with a ribbon just to add a little something to them. They each have a magnet closure to keep your pics all safely in place.

I just love the papers in the collection!! These little photo pouches/boxes are constructed using an accordion method to expand and hold the maximum amount of pics. Such an easy project that I loved creating. I will include a cutting guide below for the photo pouches/boxes.

Accordion Photo Pouches/Boxes Cutting Guide

 Using cardstock, cut at 4 5/8" x 7 3/4"
Score on the 7 3/4 along the top at: 1 1/4. 1 1/2. 4 3/4 & 4 7/8


Hinges: cut 2 from cardstock at: 3" x 2 3/4"
Score with 3" along the top at: 1/2 . 1 . 1 1/2 . 2 . 2 1/2


Accordion fold as shown. Burnish all score lines on all pieces.


Add score tape to both sides of each hinge. Burnish.


Remove tape backing and stick down to each side of the main piece as shown. Be sure to place the accordion folded hinges with the fold facing the outside and aligned on the outer edge. Remove the top tape backing pieces and carefully line up the folded piece folded over and stick it down.


Round the corners on the top of the piece and add a small magnet. I also apply a piece of scoretape across the magnet for extra hold. It  will be covered with pattern paper and won't be seen anyway.


Allow the other magnet piece to stick to the first one and lining up the top folded piece, fold over and stick down the other magnet section. I also add a piece of score tape for extra strength. 
Of course when you are ready to add your pattern papers, remove the tape backing from the magnets and cover with pattern paper. 
I always ink my papers before applying as I like the appearance and feel it gives a finished look, but if you prefer no ink, so be it.

Super easy and super useful! These can be made to fit any size you'd like and by making the accordion hinges with more folds, you can make them more expandable to hold even more!! So, enjoy and create what you like!

Note:
I will be posting another project, so be sure to check back shortly.
Please take a moment to check out my youtube channels:  Brenda Crouch     &    bren crou       


 /

Tuesday, May 11, 2021

Altered Cigar Box / Recipe Box

I love altering cigar boxes and I am always on the lookout for boxes. I had no idea at first how many different sizes and shapes were available.....but trust me when I say there are M A N Y! I like how this quick one turned out. When I saw these 2: 


I knew I had to grab them because I would do something with them. So, they sat on my Cigar Box shelves for a while....and just the other day, I thought, hmmmmm that would sure make a cool recipe box! So, that is exactly what I did with one of them. I will come up with something else for the other one I'm sure. I loved how the lid opened and the front was open....made for an interesting box. 


On one side I added some matted cut a parts from the collection: BoBunny Kiss The Cook & Family Recipes. There was several to choose from, but I liked how these seemed to go easily with what I had already put together. I pop dotted the Carnation Milk one to add some dimension (I love dimension). 

The other side. I have had the spoon and fork for ages and don't even recall where I got them, but as I was searching through my stash for things to use for this project, I ran across them and thought PERFECT! I thought the size and style were a perfect fit and it brings another touch of raised embellishments to the project.


The bottom of course can't be left out. I had some bare wooden pieces in my stash and these I thought were the perfect fit for 'feet' for this recipe box. I used a black permanent Sharpie to color them (be sure to wear gloves) and voila! Feet! I try to remember to add my stamp to the underside of my creations.
Lifting the lid, I put a pocket on the lid underside and it holds some more of those cool cut a parts I matted. Notes are more recipe cards could be stored there as well. Inside the box, there are 8 recipe card holders. Each holder would accommodate approximately 40-50 recipe cards, so that's like 400 recipes contained in this snazzy little recipe box. I am going to make my own recipe cards and add tabs on the tops but haven't decided just yet on what I want them to look like. I will share that once I create them.


Just a little sample of a prototype recipe card with a tab. Had to make sure the size what appropriate and the tab wouldn't interfere with the top closing. I want something a bit different, so that's why I will be making my own.


Once I had finished the box..... I knew I wanted something for the top. Had to be something that would stand out..... That's when the easel idea came to mind and so I created one to stand the recipe cards on and added a little clip on the side to hold the card firmly in place. I think it set the recipe box off and I was pleased with the finished look. 

Expanding Pocket Recipe Files Cutting Guide

Finished size: 5 X 4

(8) Cut cardstock at 8x5

Score with short side across the top: 1/2 & 1

Score with the long side across the top: 1/2, 1, 1 1/2, 6 1/2, 7, 7 1/2

Cut away the 3 scored areas on each side along the bottom as shown above. Angle cut for a smoother fit.

Accordion fold the score lines and burnish. 

Add scoretape to the tops of the accordion folded pieces. On the bottom edge fold it in on it's self and add scoretape.

(8) Cut cardstock 5X4 this will be the face of the file pocket.

Remove the tape backing from the bottom flap first and carefully line up the sides and stick them down to the bottom flap. Remove the side tape backing next

Lining up the bottom and sides with the 5 x 4 piece stick it down. Your pocket file is complete and ready to paper. 

NOTE: Before adding papers, ink the edges. Papers for the pocket files are cut at: 4 3/4 x 3 3/4 this will give you a nice 1/8 border around the face of the pocket file. 


I hope you enjoy this altered project. It would be silly of me to list all the sizes for the papers on this box, as it would differ of course unless you are using the exact same box. I wanted to share the way to make the pocket files however...as they can be resized to meet whatever specs you have for your box. I paint all the edges both inside and out of my cigar box first and  let it dry fully. I also use 'Hockey Stick Tape' to reinforce my lid so there is no cracking or breaking when it is opened and closed. I put it on both the inside and outside of the lid seam. 

I have a youtube walk-through of this project:
https://www.youtube.com/watch?v=8dQA5gv-86U

Please take a moment to subscribe to my channel as I will be posting many more projects.