Pages

Friday, April 29, 2022

Enchanted Chest


My design team creation for The Rubber Buggy. OMG, I honestly was really surprised at how beautiful this collection is. ENCHANTED by Memory Place is so versatile, it could be used for a floral garden project or it is feminine enough to make a beautiful ladies project. I have created a 'chest' using cigar boxes I obviously altered. Each 'box' is different in it's appearance as well as functionality. This piece is a nice size and can hold a ton of items, making it not only pretty but very very useful. This collection features flowers and fairies but in such a tasteful way making it so very easy to use. This is the front of the chest showing the 3 levels and the beautiful papers and embellishments I have used from the collection to adorn it even a bit more. There is sooooo much in this collection, I wanted to use as much as I could.
The bottom section has a hinged drop down front that holds a waterfall album (waterfalls are one of my all time favorite techniques) and holds a many spaces for photos as well as journaling.
Level 2 has a drawer that also holds a ton of the fabulous cut a parts from the collection ready to be used as is or to further their use and make cards or booklets.
Level 3 has a lift off lid and hold journaling cards as well as many tags, all from this collection!


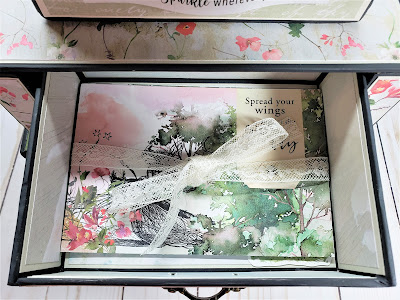
Opening the bottom flap using the pretty ornate handle reveals the album inside. You can see I have matted and papered the inside of the boxes as well as the outsides. Such a beautiful collection with fabulous pattern papers, the hardest part of it was deciding how to used them all. The album I created is a 5X7 waterfall album. I have also created a large 'book band' to keep it closed so it fits nicely inside the bottom box. 

The Album in it's large box band


The large box band


The back and side of the box band with the album behind


The waterfall album showing the outside cover front, back and spine


The waterfall album opened. I love waterfalls because they offer so much room in such a small space. I also created a pen box inside so it's handy to used those journaling cards and add notes to pics.


Doesn't that pen just absolutely go with the album!


Middle box with it's drawer open showing the beautiful 'post card size' cut a parts it holds. These would be perfect for mailing as a card, or using to create a booklet or even adding photos too. By altering the cigar boxes, I removed the front of the lower one to make the hinged drop down panel. Cutting part of the front section on the second box I built up the inside to make a drawer 'track' and used a smaller cigar box to make the drawer removing the top of it. 

The top box has a completely removeable lid accented with a cute little double beaded pull. I also used the "Leave a little Sparkle wherever you go" from the paper and let it be a curvy dimensional enhancement. The lid is show with the 'under side' so you can see the pretty pattern paper.


Look at all the journaling cards and tags stored in this top box. These are all from the collection! Plenty to use. Showing the lid ajar to see how pretty the top box is papered inside.


The top box looking down to show the lid in it's entirety. 
This was a fun fun project to do and so easy with that collection.


The back side of the 'chest'


The feet, I used the unfinished wooden pieces and painted them and decorated them modestly with Stickles.


All of the box open


Such a fun fun project. I hope you enjoy this one! You can find this collection 'Enchanted' by Memory Place at The Rubber Buggy (links below). Links also to my youtube walk through as well as a materials list.

Materials List
  • ENCHANTED by Memory Place 12 X 12 paper pad
  • ENCHANTED 8 X 8 paper pad
  • ENCHANTED Journaling Cards
  • ENCHANTED Ephemera Pack
  • ENCHANTED Cut a Parts
  • My Colors Cardstock 'Desert Cactus'
  • My Colors Cardstock 'Shale'
  • Cream Cardstock
  • Various size cigar boxes
  • Ceramcoat Acrylic Paint Charcoal
  • Score Tape
  • Art Glitter Glue
  • Stickles Red 
  • Unfinished Wooden pieces (4)
  • Hardware Tim Holtz
  • Unfinished Wooden bead
  • White bead
  • Black Chipboard
Links


Friday, April 15, 2022

Book Box with Accordion Files Pouches
using the beautiful 49 and Market Vintage Artistry Essentials. This is my design team project for Pear Tree Treasures in which I used Eileen Hull's Book Box Die. This is probably the easiest box I've ever made using this die, everything is right there for you to simply cut using your die cutting machine and put it together....easy peasy! All of these products I used for this project can be found over at Pear Tree Treasures and I will have a link below to that fabulous shop! I will also have a link below to my youtube walk through and a materials and cutting guide so you too can make this easy project. What a super fun one and useful to store pictures, in those accordion files or journaling, notes or letters. So so many ways to use this fun Book Box and make it your own way, but if you like what I did, it's an easy one to replicate.


On the front cover, I loved the little pop of a turquoise color in the pattern paper, so I used some sheer ribbon close in color along with a pretty lace ribbon on top to give it a more subtle appearance. I loved the 2 full size sheets in this collection with amazing pop out cardstock pieces with butterflies, flowers, leaves and sayings. I inked everything using sepia ink and used a bit of colored ink to dab in a bit of that color on the cover here and there. The butterfly has some of the color as well and inked also. I love the spine piece in this book box die as it is already scored for you and makes for easy placement. I chose to mount it on the outside of my covers and used strips of the pattern paper to fill in. I added some ink and color to carry that pretty slight coloring around. The leaves, butterfly and sentiment are all curled to add dimension and pop dotted on along with some glue for extra reinforcement.


The spine. With the score marks already there, it means easy installation and I love the 'curve' it adds.

The back of the book box. This paper is just fabulous with the leaves and vines....so so pretty.

The book box opened I added the strips of pattern paper to the inside of the spine as well....so easy. The papers are too cool to cover, so I left this pattern on the inside cover alone. I liked how it came across and worked so well. Inside you can see the contents. I always place a piece of ribbon to aide in the lifting of the contents and besides, it's pretty also. There are 3 accordion files inside decorated with some of those awesome cardstock pop outs.
With the contents removed you can see the inside of the box. It has all been papered....inside, outside, sides all around. I added the ticket stubs inside.

Each accordion file pouch is secured closed with magnets so your contents will stay safely in place. I decorated the pouches with those cool pop outs and inked them all.
I covered the magnets on all the file pouches with pop outs. Inked and colored some.
I had some turquoise paper ( lucky me), and used them for the accordion pockets inside the file pouches. Each one has 5 expandable pockets. Lots of space in them!

Love this collection!

Such a pretty collection with lots of foliage!

Lots and lots of space in these accordion pouches!

Loved making these accordion pouches!

The pop outs are amazing and so many to choose from!

You can never have too much storage space!
I hope you liked my use of the super cool Book Box Die and what I chose to carry in mine. 
Stop back again, as I will have many more design team projects coming up as I'm staying busy with creations.

MATERIALS LIST:

  • Eileen Hull Book Box Die
  • Sizzix Mat Board
  • 49 and Market Vintage Artistry Essentials 12 x 12 Collection Pack
  • Turquoise paper
  • Sepia Ink
  • Turquoise colored ink
  • Turquoise sheer ribbon
  • Cream colored lace
  • Art Glitter Glue
  • ScoreTape 
  • Magnets       
Cutting Guide
*Pattern papers cut 1/8 smaller for box cover front, back, insides, spine, inside box inside bottom, all sides outside and inside.
*3) Patterned Cardstock (or plain your choice) 
 10 5/8 X 5 3/4. These are the pouches that will hold the accordion files inside.
*15) pieces of paper (I used plain colored paper) 
8 X 5 1/2.
Assembly Instructions (please read all instructions before assembling)
Using the Eileen Hull Book Box die, cut all pieces and assemble per package instructions (super easy).
I cut my papers 1/8" all around to fit. Ink all pieces before assembly to make it easier.

Accordion File Inserts
3) Patterned cardstock pieces on the long side across the top score at: 2 * 2 1/8 * 6 1/2 * 6 5/8
Fold on score lines and burnish . When using patterned cardstock, check to make sure your patterns will be facing the correct position and not upside down when put together. I used a 1/2" corner chopper and did my fold over edges that will be the closure flap (shortest piece). Ink and set aside.
15) Plain papers with 8" across the top, score at 3 3/4. Fold on score line and burnish. Glue sides closed close to the edges. 
On the front sides of the file pockets add 3 strips of score tape from just below the top edge to the bottom. One in the center and one of each side about a 1/2" apart ( you can also use a good strong glue like Art Glitter Glue) lay the second pocket on top placing the backside on first, line up and make sure they are straight. I use my Score Board as it is a huge help in keeping everything straight. Add adhesive to the front of that one and add the next in the same manner. Continue until all 5 pockets are adhered together. Place adhesive on the front of the top pocket and on the back of the bottom pocket. Get your Pouch and lay it flat with the inside facing up and carefully place the stack of pockets on to the pouch centering it evenly to the 'back' of the pouch first. Press down the make sure it is stuck down well. Remove the paper from the tape strips on the front (or add the glue) and carefully fold up the pouch making sure to keep the stack off the score lines and allowing for the 1/8" gusset to show along the bottom ( you would also do this when adding it down in the first step allowing the top fold over flap to show that 1/8" gusset). Now line up the sides of the pouch and stick it down. Burnish to make sure it has adhered well. Fold over the top flap and Voila! You have an accordion file in a pretty pouch! Decide what you want to do for a closure, I used magnets and add those now. I covered my magnets with some of the fabulous pop outs from the collection. You could also used velcro or ribbon or twine....your choice. 
Add these to your box. I place a piece of ribbon in the bottom of the empty box then add my pouches, as it is easy then to simply pull up the ribbon sides and lift the pouches out. 
Decorate the box cover to your liking and add your closure (if using a ribbon closure as I have, make sure to add that to the front and back BEFORE adding your pattern papers. If you have any questions, feel free to message me and I will be happy to help you. 
Links


Friday, April 1, 2022

Sugar & Spice (lay flat) Mini Album


My design team creation for The Rubber Buggy is made from the Sugar & Spice collection by P13. I didn't think I would like this collection, but once I got it and started looking through it, OMG, I truly fell in love with it. This make an absolutely perfect dessert recipe album!! This is the cover and I fussy cut some pieces to add some wonderful dimension. Everything (except the ribbon, cardstock and chipboard) is from the collection. I used the 12 x 12 pad, 6x6 pad, decorating tags, ephemera die cuts and the cardstock stickers! Love how it turned out. This truly is a LAY FLAT ALBUM, and I will link below the tutorial to make this perfectly flat album. My friend Monica Partridge came up with this method over 4 years ago and it works wonderfully! I love dimension so I made sure to pop some of the flowers and of course the lollipops up as well as one of the stickers pieces. Such a cool collection to work with.
The back of the cover. I fussy cut one of the pretty flowers and used one of the cut a parts to stamp my 'Handmade for You' on. It tucks right in behind the flower.
Looking down inside you can see how this spine is free flowing from the cover allowing it to totally lay flat! Genius!
The inside cover and page 1

Inside cover has an expandable pocket that would hold many recipe cards. Don't you love the graphics!! I adorned the pocket with a small green ribbon and added one of the many stickers from the collection. I scallop cut the front of the expandable pocket for more interest.
Expandable pocket contents, a large tag/recipe card and a booklet.

Page 1. Each page has a side pocket that holds a pretty large tag that has the fold over. Each of the tags fold over has a magnet to also hold items under their fold over flap.

The contents from the cute stop on the bottom of the page and the large tag/mat under the flap.
The side pocket large tag exposed, it also has stops to hold more recipe cards or notes.
The side pocket large tag with the pretty magnetic fold over out of the pocket.
Pages 2 & 3 

Page 2. So many pieces you can use in this collection.

Page 2 contents

Page 3 

Page 3 contents and the large side magnetic tag exposed.

Page 3 contents and large magnetic tag out

Page 3 large side pocket magnetic tag opened to show it too has stops to hold recipe cards
Pages 4 & 5

Page 4 

Page 4 contents 

Page 5

Page 5 contents

Page 5 contents and you can see the large side magnetic tag pulled open to show
Pages 6 & 7

Page 6

Page 6 contents showing an accordion fold booklet with stops for recipe cards

Another view of the accordion fold booklet

Page 7

Page 7 contents
Pages 8 & 9

Page 8 

Page 8 contents

Page 9

Page 9 contents

Page 9 contents


Page 9 contents. What a fun fun collection to work with!
Page 10 & 11


Page 10

Page 10 contents

Page 11

Page 11 contents

Page 11 contents
Page 12 & inside back cover

Page 12

Page 12 contents
Inside back cover

Inside back cover contents.
This album was such an easy one to do and what a pretty way to store all those dessert recipes. The graphics in this collection are so colorful and amazing, it was a pleasure to work with. The cut a parts worked out so well and all the choices make it easy to customize to your own liking. What a great gift idea for those special 'bakers' in your life.
This lay flat method of construction makes for a super awesome recipe book as you do NOT have to worry about the pages staying opened. Love this method and highly recommend you check it out, I have the link below. You can find this Sugar & Spice collection over at The Rubber Buggy and I also have a link below for that shop. My you tube walk through is linked as well below.

Materials List

  • Sugar & Spice 12 X 12 pad
  • Sugar & Spice 6 X 6 pad
  • Sugar & Spice Decorative Tags
  • Sugar & Spice Ephemera Die Cuts
  • Sugar & Spice Stickers
  • White Cardstock
  • Green Ribbon
  • Art Glitter Glue
  • ScoreTape
  • Chipboard 
Links

 Collection can be found:

Walk through:

Lay flat tutorial:
https://www.youtube.com/watch?v=Xia6i8k2-IQ